Keep these tips in mind when working with actions that use HTML.
Insert vs Edit Actions
You have two options to edit existing content with an action on your site: Edit actions that change a current element, and Insert actions that replace an element with a new one. While both action types can achieve the same end result, one subtle difference between the two can affect the way other elements on your site interact with the action.
Insert actions hide the original site element and insert a blank <div> for the new action. This means that the new action does not inherit any styles associated with the specific IDs or classes of the old element.
Edit actions create an exact duplicate of the original element and then allow you to edit the duplicate. The new one inherits any styles associated with the specific IDs or classes of the original element.
This difference may not always impact functionality depending on how your site is set up. In some cases, however, it can. For example, you have a JavaScript element on your site that looks for an ID, and you still want that element to function. In this case you should use the Edit action. Conversely, if you want the action to have its own CSS rules independent of other elements on your site, then you should use an Insert and replace action.
Don't Forget to Close Tags
Tags are the source for the most prevalent formatting issues. Always ensure that you close tags. Otherwise, you encounter validation and browser rendering errors. Here's an example:
<ul>
    <li>Some text here, but missing a closing tag.
    <li>More text here in the list, and a proper closing tag.</li>
</ul>
In this example, the unordered list tag, <ul>, and the second line item <li> both have a corresponding closing tag. The first <li> does not. This error may cause a browser to render the action incorrectly.
Here is the corrected code:
<ul>
    <li>Some text here, but missing a closing tag. </li>
    <li>More text here in the list, and a proper closing tag.</li>
</ul>
If you use the WYSIWYG editor rather than the source editor, tags are handled for you.
Don't Include HTML DOCTYPE Declarations
Including HTML <!DOCTYPE> declarations in an action is another source of errors. These declarations can include the following:
- Title
- Meta attributes
- Body
The reason you do not need any <!DOCTYPE> declarations it that Monetate already inserts the HTML into a specific position within the code, thereby eliminating the need for <html>, <head>, or <body> tags.
In this example you can only include the HTML contained within the <body> tags in the action.
<!DOCTYPE html>
    <html>
<head>
<title>Page Title</title>
<meta http-equiv="Content-Type" content="text/html">
</head>
<body>
div id="main">
    <ul class="nav">
        <li>Home</li>
        <li>About</li>
    </ul>
    <div class="hero">
    <img src="/images/hero.png">
</div>
</div>
</body>
</html>
Don't Build Separate HTML and CSS Actions
You might try to build separate actions for HTML and CSS that affect the same element. Monetate gives you the option for both HTML and CSS, but you might not necessarily need to use both action types.
For example, you want to hide outdated delivery options and return policy links on your site as well as replace them with new options that include CSS styling.

Theoretically you could accomplish these changes with three actions in a Web experience:
- A Hide Element action to hide the outdated links
- An HTML — Optional JS action to insert the new options
- A CSS action to apply the CSS styling
In this situation, however, you shouldn't separate the CSS from the HTML to which it applies. In fact, you can accomplish all three of these tasks in one Edit HTML action with the CSS built in.
Some situations benefit from having a separate HTML action and CSS action. However, for the purpose of simplicity, it is often easier to build one action.
Don't Overuse Line Break Tags
Line break tags, <br />, are often misused when <div> or <ul> tags could instead be used. This misuse can cause some problems.
Avoid crafting code as shown in this example:
<a href="http://www.monetate.com/products/personalization/">Products</a><br />
<a href="http://www.monetate.com/customers/">Customers</a><br />
<a href="http://www.monetate.com/resources">Resources</a><br />
Here's a better way to write that code:
<ul>
<li>
<a href="http://www.monetate.com/products/">Products</a>
</li>
<li>
<a href="http://www.monetate.com/customers/">Customers</a>
</li>
</ul>
Using a line break tag isn't technically wrong, but using <div> tags makes it much easier to break up and style content later.
Avoid Putting a div Tag in a Link
You can put a <div> tag almost anywhere in HTML—but not inside of a link. If you put one into an anchor (<a>) tag, the action breaks in some older browsers.
If you need to change the URL of a link on your page, then create an Edit HTML action instead. Select the element whose link you want to change using the Element Selector. The Element Selector often chooses an anchor by default.
If you edit the HTML inside an anchor tag, the link doesn't function properly because you are placing a link inside of an existing link and the existing link takes precedence.
To make this adjustment properly, select a higher element in the DOM by clicking the name of the element you currently have highlighted using the DOM selector tool.
Choosing <div#header.clearfix>a> using the Element Selector allows you to change only the text of the link (what can be clicked), and editing <div#header.clearfix> allows you to change the URL as well as the text.
Block Elements Don't Belong in Inline Elements
An HTML element is displayed as block or as inline by default. Block elements, such as <div> and paragraphs (<p>), make up the structure of the page. Inline elements, such as anchor and span tags, reside in these blocks. Here is an illustration of the difference between block and inline elements and how they are laid out.
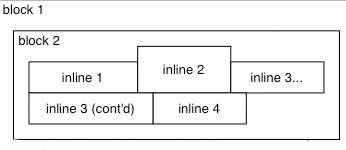
Because of this formatting, you should avoid putting block elements inside any inline elements.
Don't do this:
<a href="#"><h2>Block inside Inline</h2></a>Do this:
<h2><a href="#">Inline inside of Block</a></h2>