An HTML Countdown action on the cart page of your site can help you to increase your overall conversion rate by creating a sense of urgency in an experience. Ultimately, if you minimize the number of people who leave your site on the cart page, then you're more likely to get them to convert (or complete their purchase) for what is already in the cart.
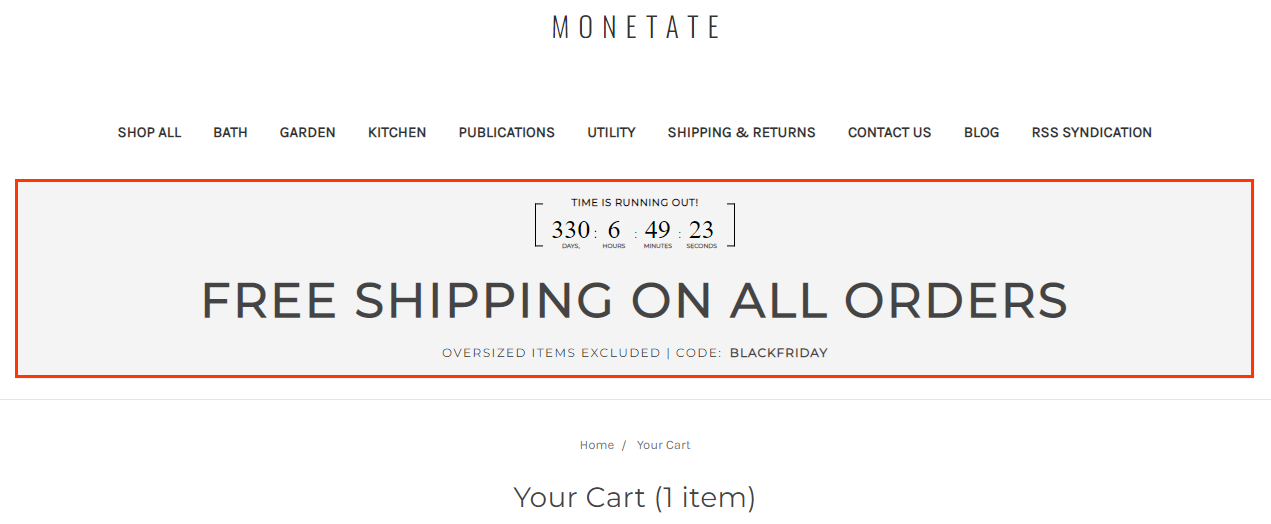
For the purpose of this example, the experience targets all site visitors with a promotion for free shipping that expires at the end of the day on Black Friday. The HTML Countdown action counts down the remaining time until the promotion expires.
Building the Countdown Timer Action
Follow these steps to build the action.
- Click COMPONENTS in the top navigation bar and then select Actions.
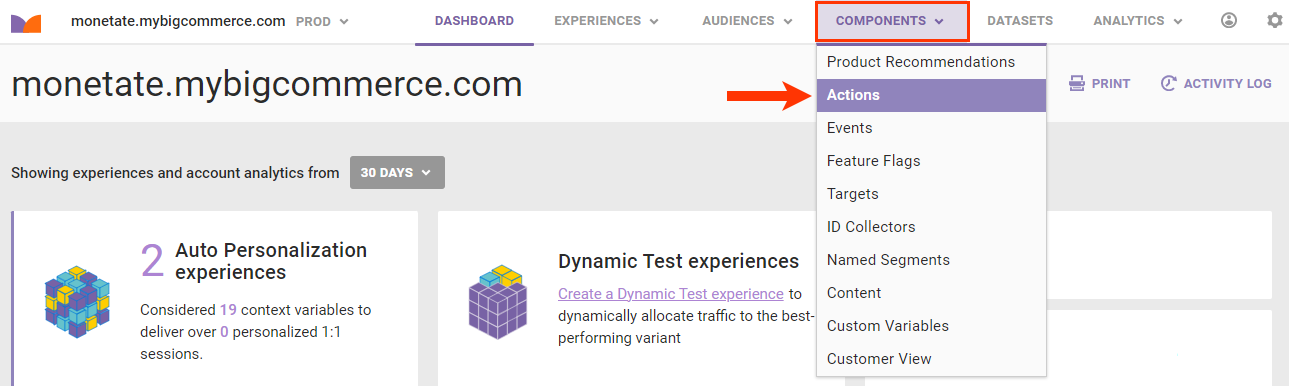
- Click CREATE ACTION.

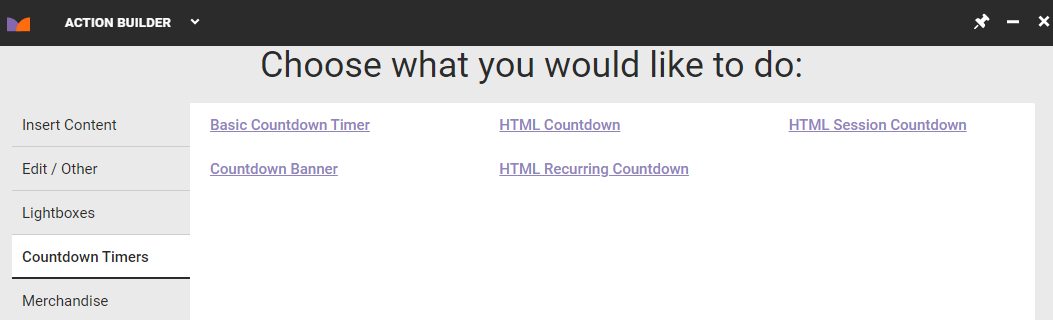
- After Action Builder loads on your site, navigate to the cart page. In Action Builder click the Countdown Timers tab, and then click HTML Countdown.
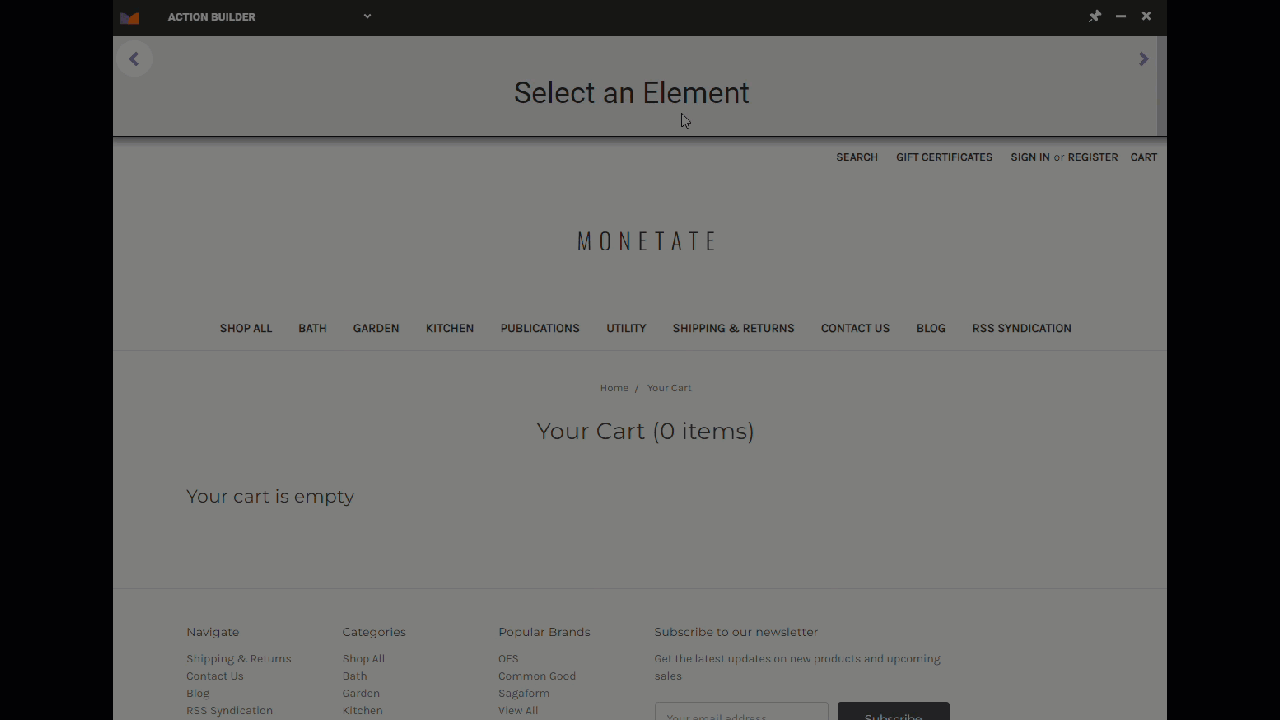
- Use Element Selector to identify where on the page you want to insert the HTML Countdown action. For the purpose of this example, the action should be inserted below the sticky navigation. This animation demonstrates how Element Selector works in Action Builder. See Element Selectors for more information.
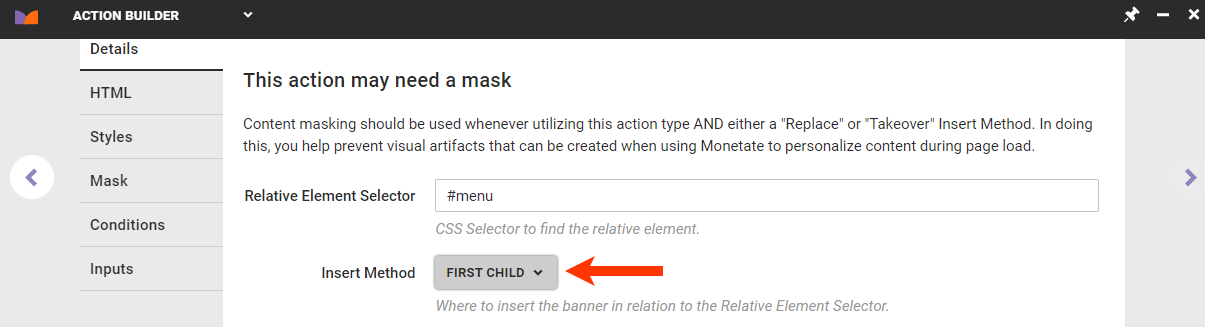
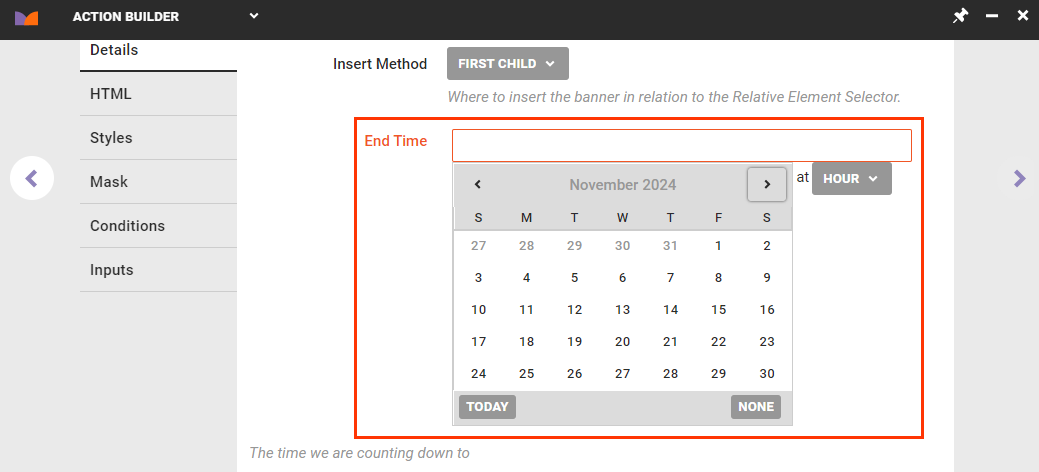
- On the Details tab, select After from Insert Method.
- Use the calendar to configure the action to count down until the end of the day on Black Friday.
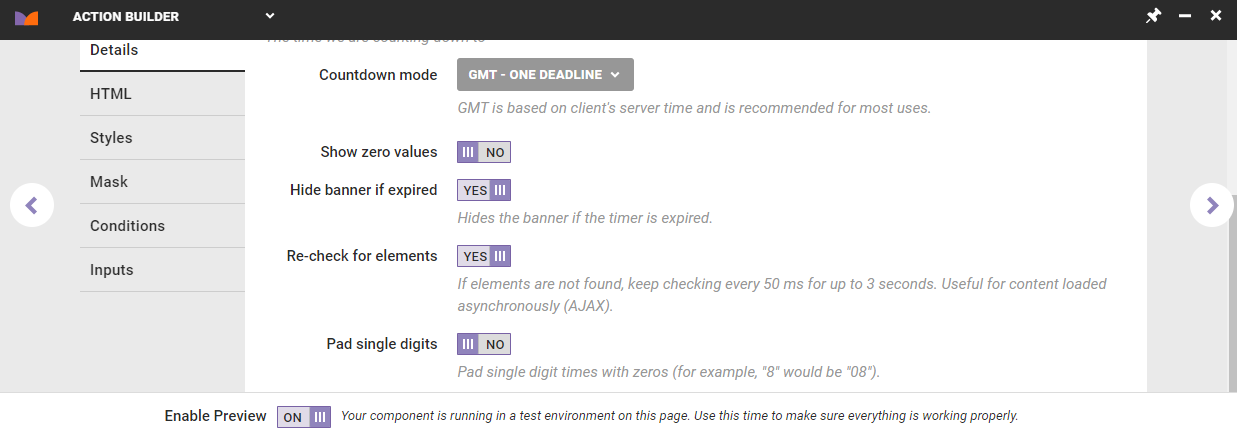
- Leave Countdown mode set to GMT - one deadline, toggle Show zero values to NO, and then leave Hide banner if expired set to YES.
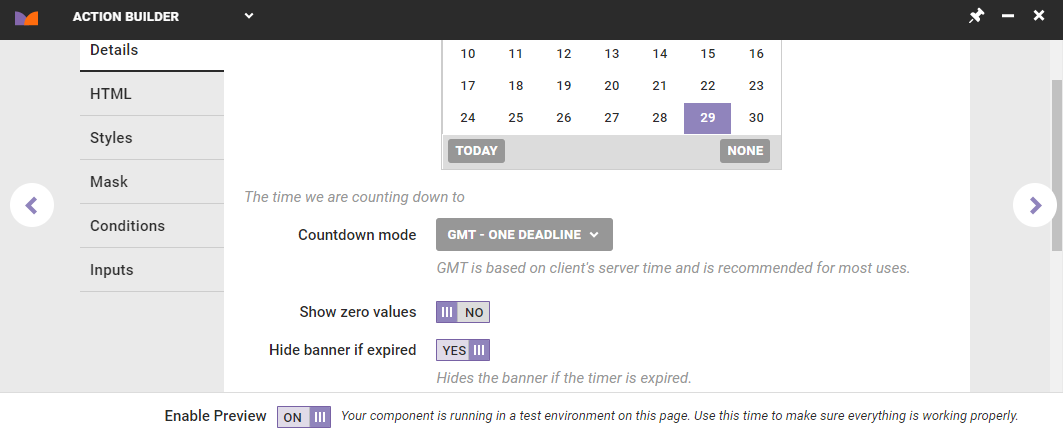
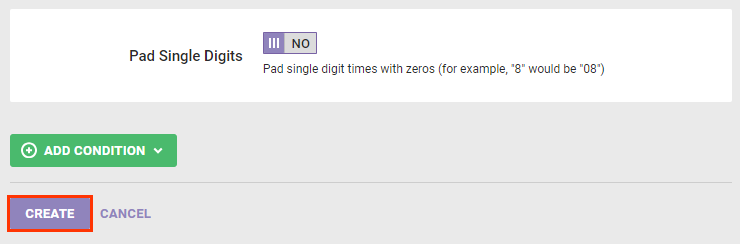
- Toggle Re-check for elements to YES, and leave Pad single digits set to NO.
- Click the HTML tab and, if necessary, click Source in the editor to revise the countdown banner text. The following HTML code is specific to this example.
<section class="mt-cat-banner">
  <div class="mt-cat-banner__countdown">
    <p class="mt-cat-banner__pre-header">Time is running out!</p>
    {{DAYS} day[s],} :{{HOURS} HOUR[S]} <span class="mt_colon">:</span> {{MINUTES} MINUTE[S]}
    <span class="mt_colon">:</span> {{SECONDS} SECOND[S]}
  </div>
  <h3 class="mt-cat-banner__heading">Free Shipping On All Orders</h3>
  <h3 class="mt-cat-banner__subcopy"><span class="mt-cat-banner__code">OVERSIZED ITEMS EXCLUDED | CODE: <strong class="promo-code">BLACKFRIDAY</strong></span></h3>
</section>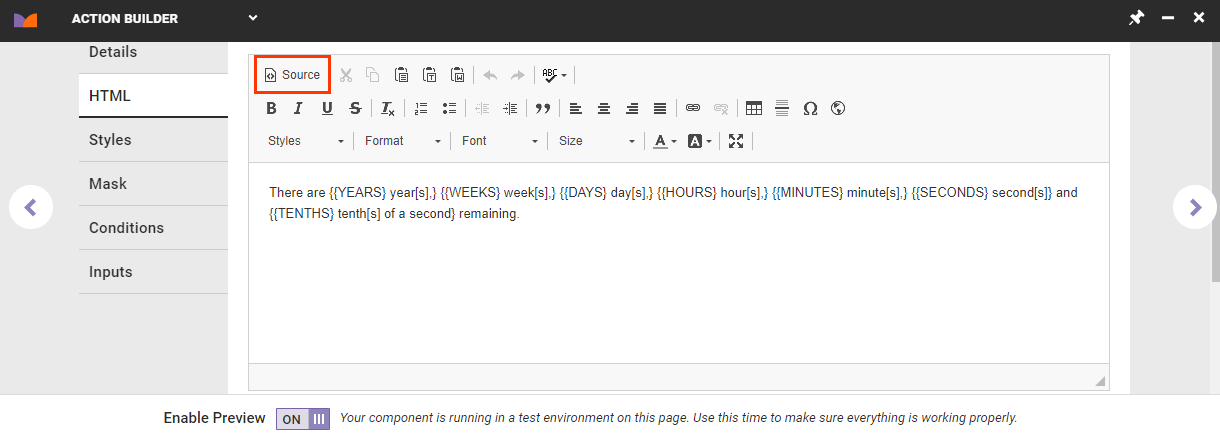
- Click the Styles tab to add the following code to the CSS editor.
.mt_countdown {
  display: block;
  margin-left: -10px;
  margin-right: -10px;
  position: relative;
  z-index: 1;
  text-align: center;
  color: black;
  padding-top: 20px;
  padding-bottom: 20px;
}

@media screen and (min-width: 768px) {
  .mt_countdown {
    margin-left: auto;
    margin-right: auto;
  }
}

/*Hides the plural parameter on any suffixes when counting down.*/

.mt_countdown .mt_hide_plural {
  display: none;
}

.mt-cat-banner {
  -webkit-box-align: center;
  -ms-flex-align: center;
  align-items: center;
  background-color: #f4f4f4;
  background-image: url("{{BKG_URL}}");
  background-position: center;
  background-repeat: no-repeat;
  background-size: cover;
  color: #000;
  display: -webkit-box;
  display: -ms-flexbox;
  display: flex;
  -webkit-box-orient: vertical;
  -webkit-box-direction: normal;
  -ms-flex-direction: column;
  flex-direction: column;
  -ms-flex-wrap: wrap;
  flex-wrap: wrap;
  font-family: 'Montserrat', 'Helvetica Neue', Helvetica, Arial, sans-serif;
  height: 160px;
  -webkit-box-pack: center;
  -ms-flex-pack: center;
  justify-content: center;
  margin: 0 auto;
  max-width: 1240px;
  position: relative;
  text-align: center;
  width: 100%;
}

body.cms-home section.mt-cat-banner {
  max-width: 100% !important;
}

@media screen and (min-width: 768px) {
  .mt-cat-banner {
    height: 200px;
  }
}

.mt-cat-banner__countdown {
  display: block;
  position: relative;
}

.mt-cat-banner__countdown::before,
.mt-cat-banner__countdown::after {
  border: 1px solid black;
  content: "";
  display: block;
  height: 90%;
  position: absolute;
  top: 55%;
  -webkit-transform: translateY(-50%);
  transform: translateY(-50%);
  -webkit-transform-style: preserve-3d;
  transform-style: preserve-3d;
  width: 8px;
}

@media screen and (min-width: 768px) {
  .mt-cat-banner__countdown::before,
	.mt-cat-banner__countdown::after {
    height: 80%;
  }
}

.mt-cat-banner__countdown::before {
  border-right: none;
  right: 105%;
}

.mt-cat-banner__countdown::after {
  border-left: none;
  left: 105%;
}

.mt-cat-banner__countdown .mt_time {
  font-family: 'MaisonNeueBook';
  font-size: 22px;
  font-weight: 400;
  position: relative;
}

@media screen and (min-width: 768px) {
  .mt-cat-banner__countdown .mt_time {
    font-size: 26px;
  }
}

.mt-cat-banner__countdown .mt_tickerElem {
  display: inline-block;
  min-width: 28px;
  position: relative;
  text-align: center;
}

@media screen and (min-width: 768px) {
  .mt-cat-banner__countdown .mt_tickerElem {
    min-width: 34px;
  }
}

.mt-cat-banner__countdown .mt_suffix {
  bottom: -4px;
  display: block;
  font-size: 6px;
  font-weight: 700;
  left: 50%;
  position: absolute;
  text-transform: uppercase;
  -webkit-transform: translateX(-50%);
  transform: translateX(-50%);
  -webkit-transform-style: preserve-3d;
  transform-style: preserve-3d;
}

@media screen and (min-width: 768px) {
  .mt-cat-banner__countdown .mt_suffix {
    bottom: -2px;
  }
}

.mt-cat-banner__countdown .mt_colon {
  font-size: 12px;
  font-weight: 400;
  position: relative;
}

.mt-cat-banner__pre-header {
  display: block;
  font-size: 8px;
  font-weight: 600;
  letter-spacing: 0.5px;
  margin: 0;
  padding: 0;
  text-transform: uppercase;
  top: -5px;
  width: 100%;
  z-index: 1;
}

@media screen and (min-width: 768px) {
  .mt-cat-banner__pre-header {
    font-size: 10px;
  }
}

.mt-cat-banner__heading {
  font-size: 32px;
  font-weight: 600;
  letter-spacing: 2.5px;
  margin: 0;
  margin-bottom: 5px;
  margin-top: 15px;
  padding: 0;
  text-transform: uppercase;
}

@media screen and (min-width: 768px) {
  .mt-cat-banner__heading {
    font-size: 48px;
  }
}

.mt-cat-banner__subcopy {
  font-size: 12px;
  font-weight: 500;
  letter-spacing: 1.5px;
  margin: 0;
  padding: 0;
}

@media screen and (min-width: 768px) {
  .mt-cat-banner__subcopy {
    font-size: 15px;
  }
}

.mt-cat-banner__message {
  display: inline-block;
  margin: 0;
  padding: 0;
}

.mt-cat-banner__code {
  display: inline-block;
  font-size: 12px;
  font-weight: 500;
  margin: 0;
  padding: 0;
  position: relative;
  text-transform: uppercase;
}

/*.mt-cat-banner__code::before {
  content: "|";
  display: inline-block;
  padding-left: 6px;
  padding-right: 10px;
  position: relative;
}*/

.mt-cat-banner__code .promo-code {
  font-weight: 700;
  letter-spacing: 1px;
  margin: 0;
  margin-left: 3px;
  padding: 0;
}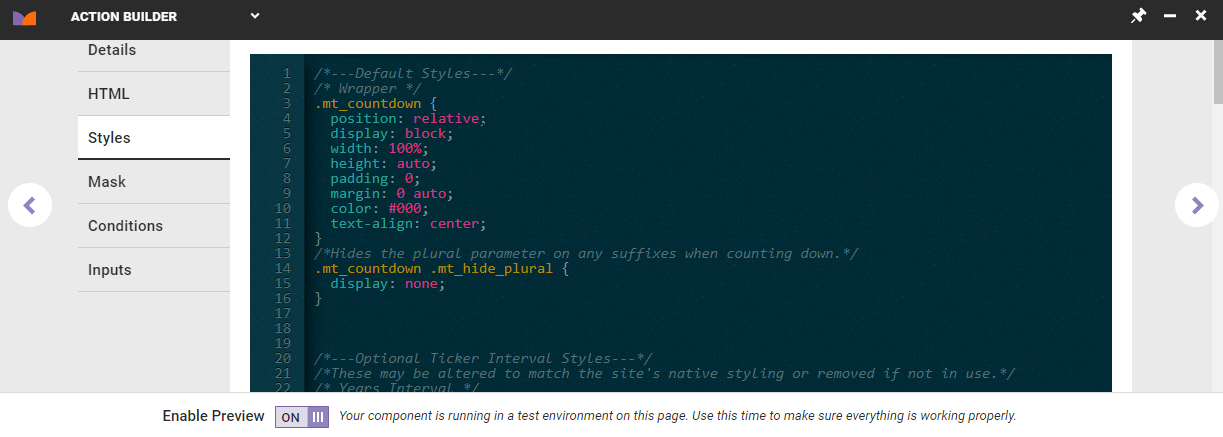
- Define the conditions for when the action should fire.
- Use the Monetate Inspector browser plugin to verify that
cartis the page type for the site's cart page.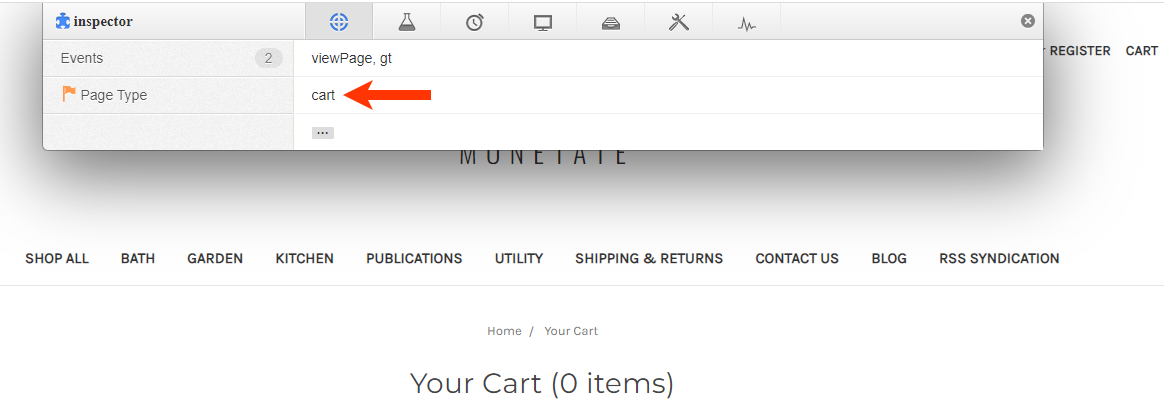
- Click the Conditions tab in Action Builder, click ADD CONDITION, expand Page type, and then select Page type=. Type
cartas the value, and then press Enter.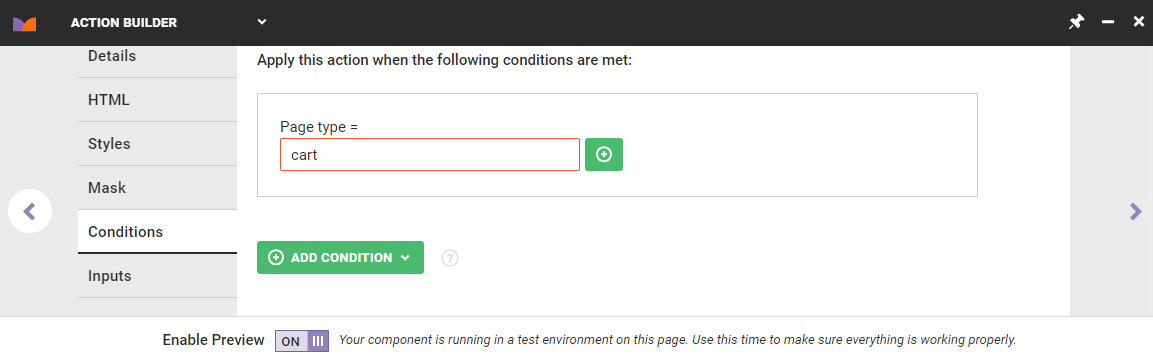
- Because the action shouldn't fire when the cart is empty, create a second action condition. Click ADD CONDITION, expand Cart Value, and then select Cart Value ≥. Type
0.01as the value, and then press Enter.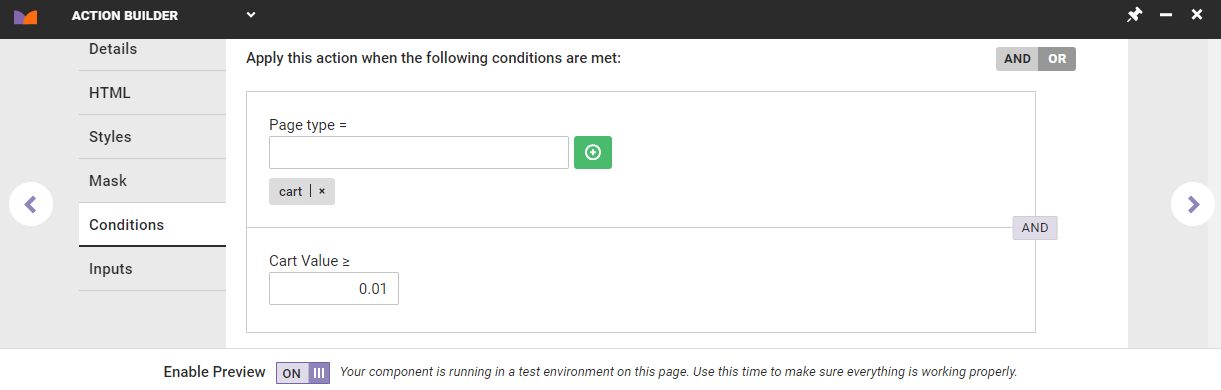
- Use the Monetate Inspector browser plugin to verify that
- Click the Inputs tab to define which action fields and settings can be configured at the experience level.

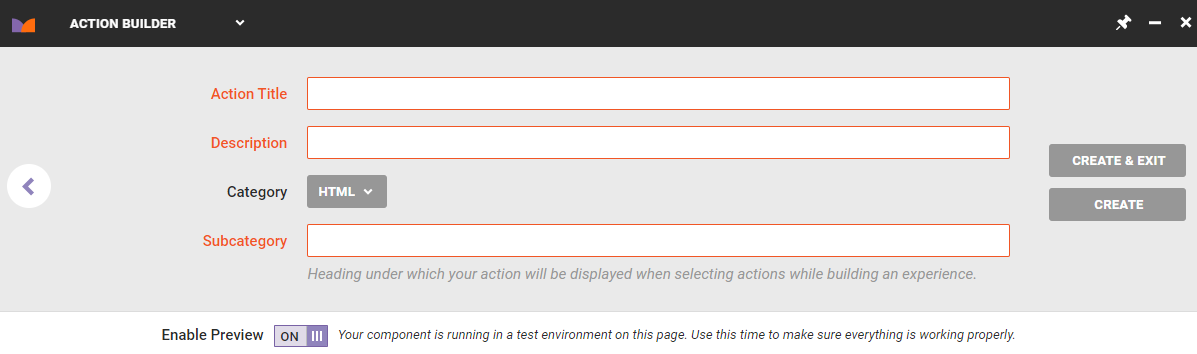
- Give the action a title, description, and subcategory. Click CREATE & EXIT.
Refer to HTML Countdown Action as well as Details Tab for Countdown Timer Actions in Customize an Action for more information about creating an HTML countdown in Action Builder.
Creating the Experience
Follow these steps to create a Web experience to deploy the countdown timer for the free shipping promotion.
- Click EXPERIENCES in the top navigation bar, and then select Web.

- Click CREATE EXPERIENCE.

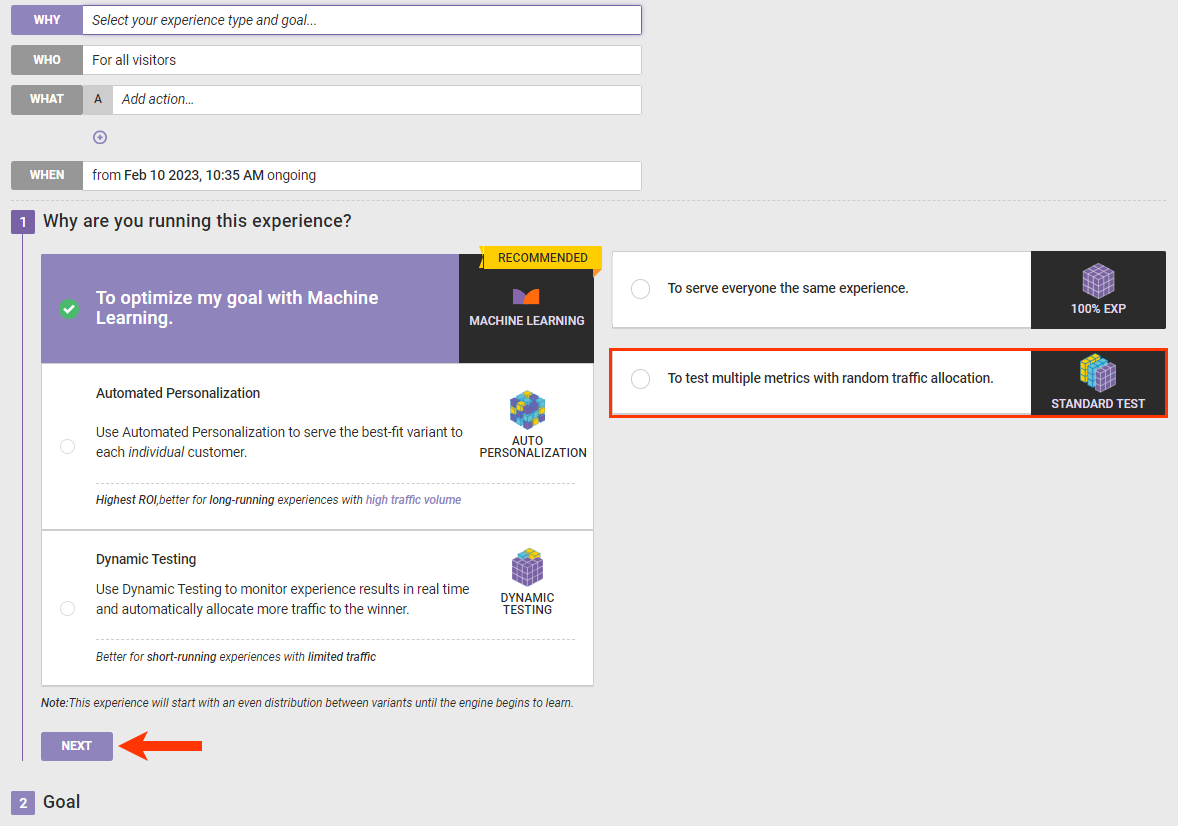
- Click WHY, select STANDARD TEST, and then click NEXT.
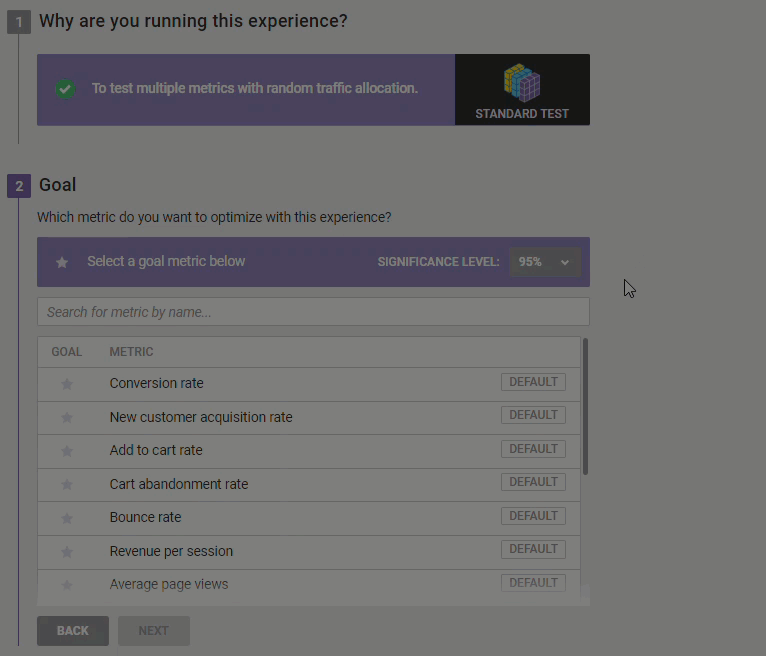
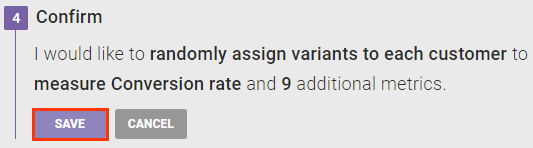
- Select Conversion Rate for the goal metric and then click NEXT.
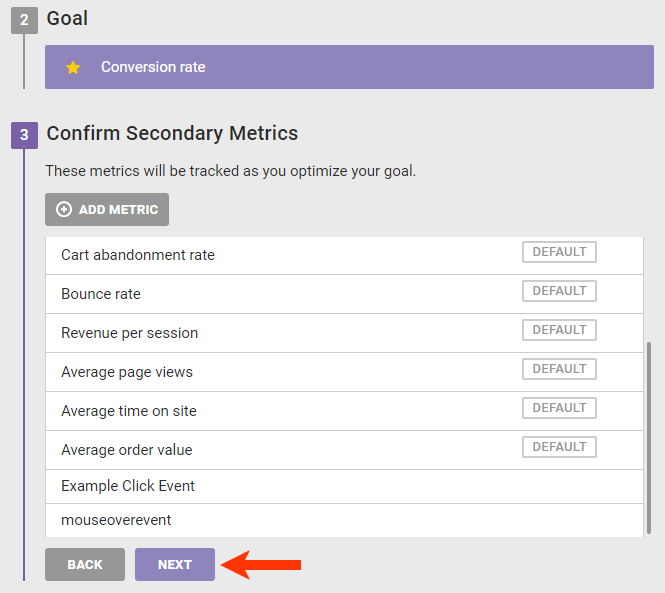
- Adjust the secondary metrics as needed and then click NEXT.
- Confirm that you have configured the WHY settings as you need, and then click SAVE.
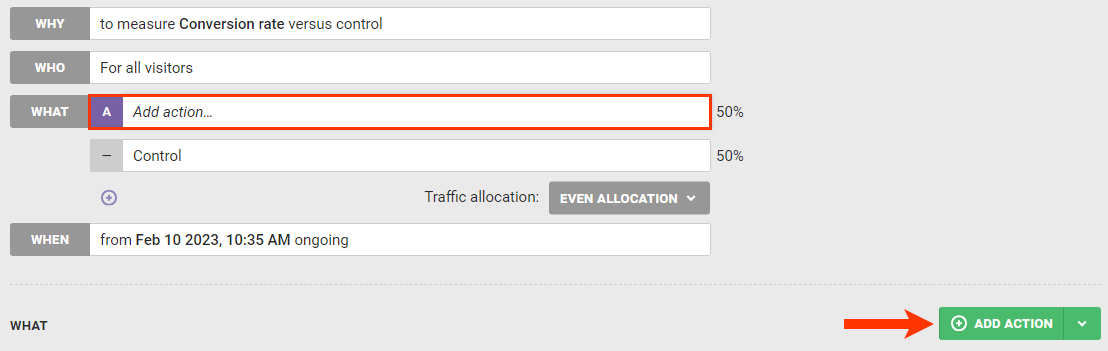
- The experience targets all site visitors, so don't change the WHO settings.
- Click A of the WHAT settings, and then click ADD ACTION.
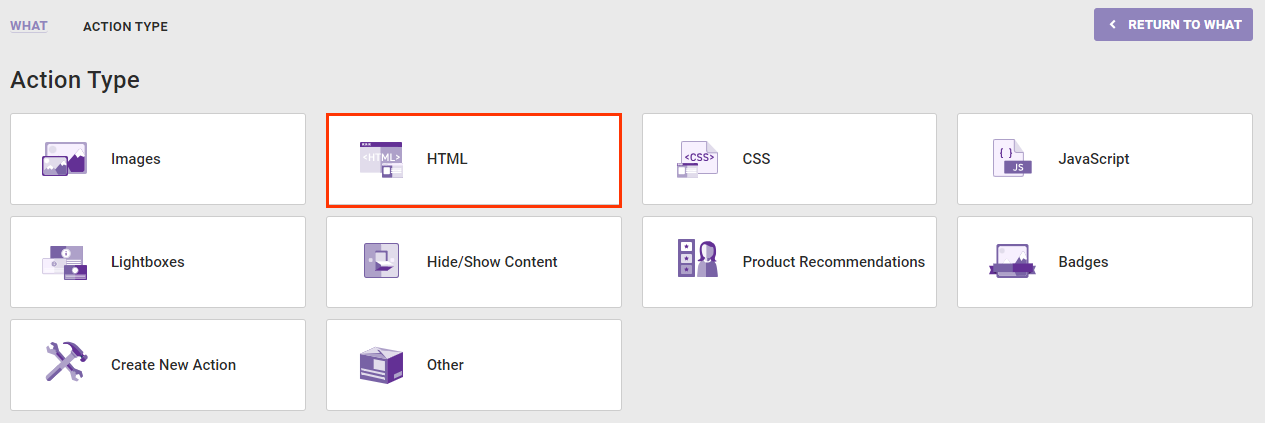
- Click HTML.
- Click the HTML Countdown action that you created.

- If you configured all the action settings in Action Builder specifically for the experience, then you don't need to make any experience-level changes or add any additional action conditions. Scroll to the bottom and then click CREATE.
Testing the Experience
Because the action is configured with an action condition that doesn't work as expected in Preview Mode, perform a quality assurance check to ensure the action works as expected before you configure the WHEN settings.
To circumvent the Preview Mode limitation for this experience, follow these steps to temporarily change the experience's target using the IP address option and then activate the experience to test it.
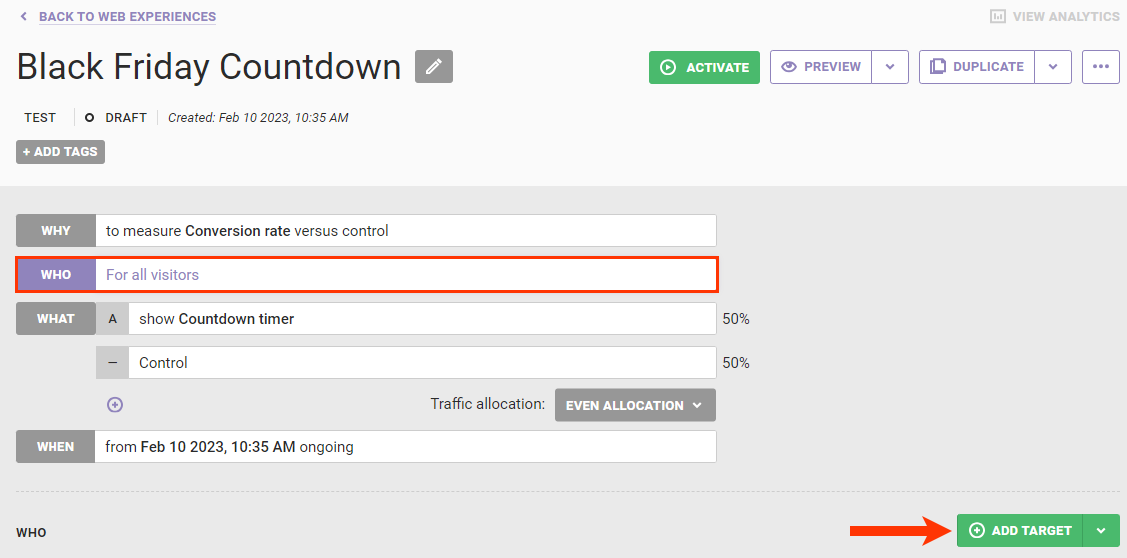
- Click WHO and then click ADD TARGET.
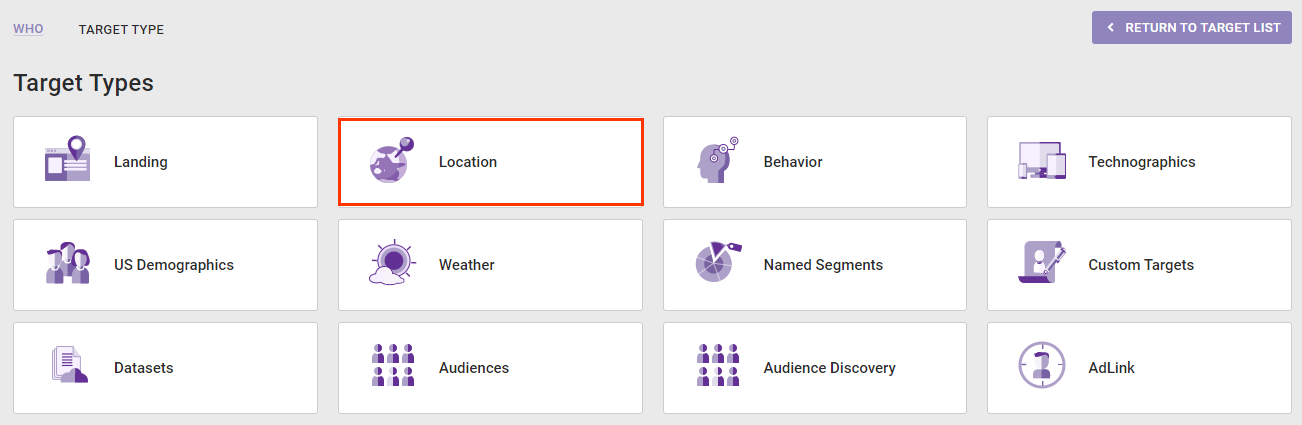
- Click Location.
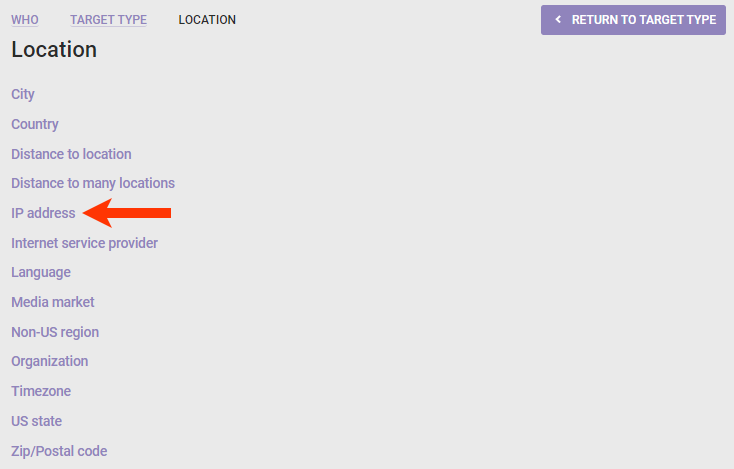
- Click IP address.
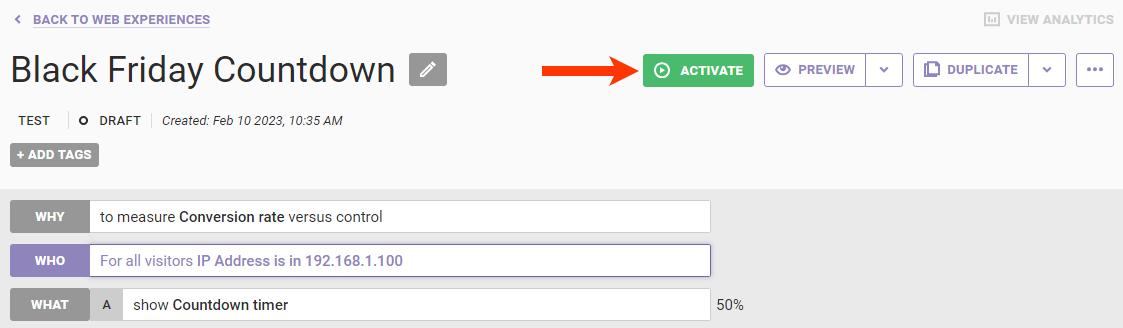
- Input your IP address into the IP Address field, leave visitors matching this target set to INCLUDE, and then click SAVE.

- Click ACTIVATE.
After you activate the experience, open your site in a private browser window and then add one or more products to your cart.
Next, navigate to the cart page. If you configured the HTML Countdown action and the experience correctly, then you should see the countdown timer.
After you confirm that the action and experience fired as expected, return to the Experience Editor page in the Monetate platform, click PAUSE for the experience, and then remove the IP address target from the WHO settings.
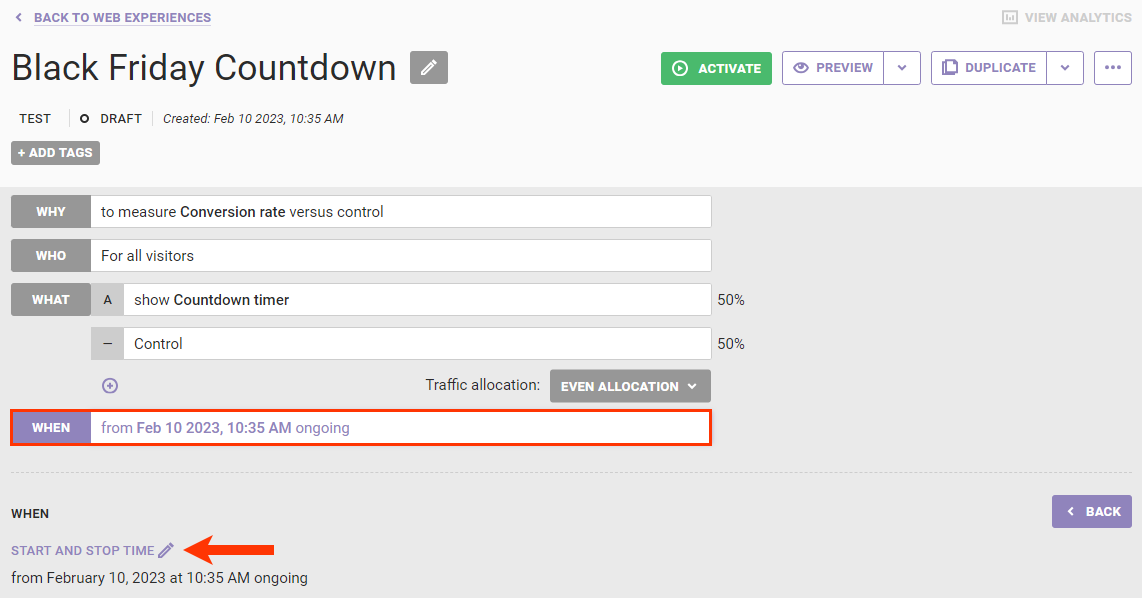
Scheduling the Experience
Follow these steps to configure the WHEN settings to deploy the experience to all site visitors.
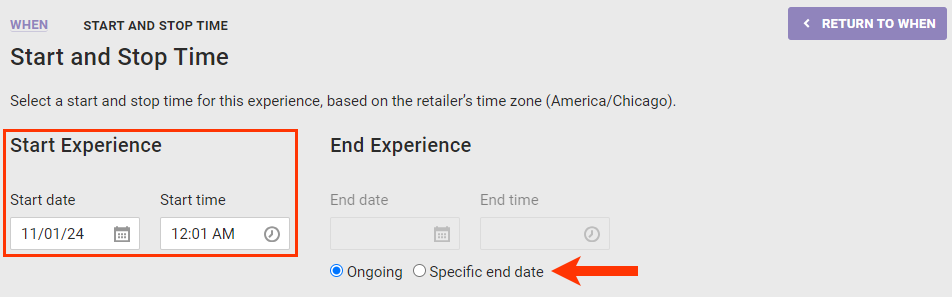
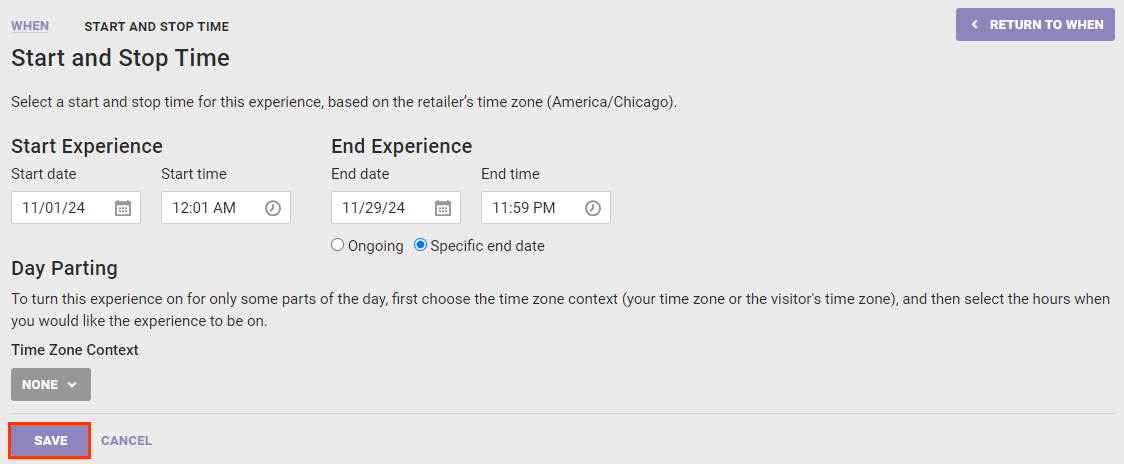
- Click WHEN and then click START AND STOP TIME.
- Configure Start date and Start time so that the experience starts for as long as you want the promotion to run before it expires at the end of the day on Black Friday. Then select Specific end date.
- Configure End date and End time for 11:59 PM on Black Friday.
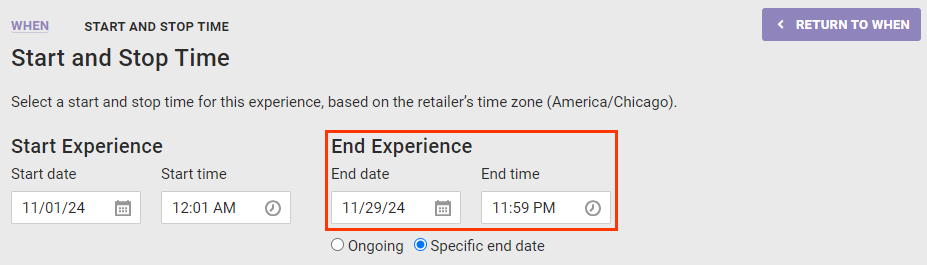
- No day parting settings are required, so leave Time Zone Context set to NONE, and then click SAVE.
- Click ACTIVATE.
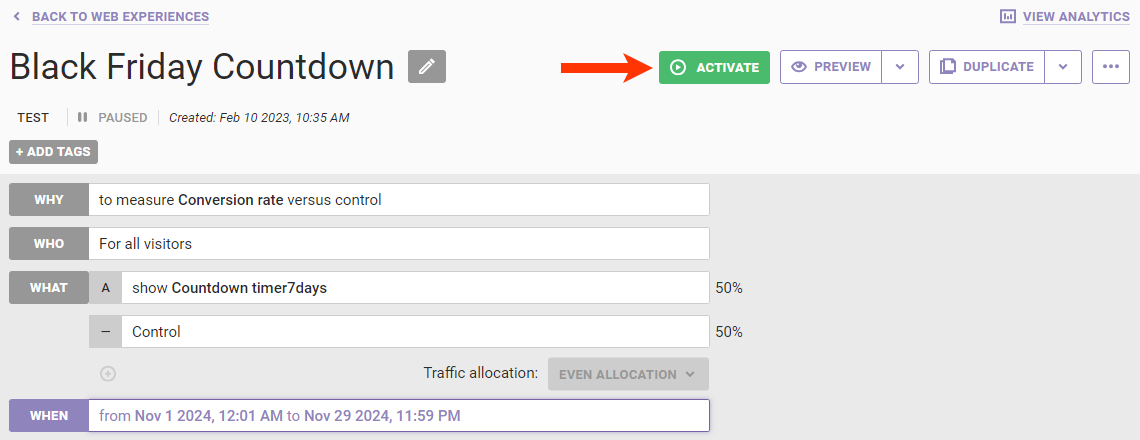
The experience is now set to go live on the scheduled date at the scheduled time.