Instead of configuring default boosting rules, pinned and excluded products, facets, and scheduled campaigns in each of the sites you've set up in Personalized Search, you can create a cluster of multiple sites to share these settings. When creating a cluster, you designate a primary store, which is the site that's the source for the configurations that Personalized Search then copies into the cluster's other sites, or linked stores.
If the primary site's mapped catalog includes a category, an attribute, or an attribute value that's not in the mapped catalog for one or more of the linked sites, then Personalized Search can't map that entity, nor can you merchandise that entity at the cluster level. However, you can still configure rules for the unmatched entity on the specific site's Visual Merchandising page.
Creating a Cluster
Follow these steps to create a cluster.
- Click COMPONENTS in the top navigation bar, select Personalized Search, and then click the appropriate product catalog on the Personalized Search list page.
- Click the Smart Category Merchandising icon in the left-hand vertical toolbar, and then select Multi Store.
- Take one of the following actions on the Multi Store Visual Merchandising page:
- Click CREATE CLUSTER if you've never created a cluster in Personalized Search.

- Click CREATE A NEW CLUSTER if you're creating an additional cluster.
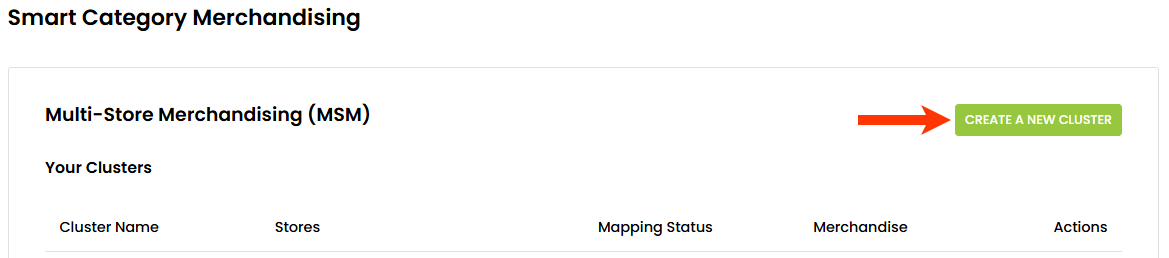
- Click CREATE CLUSTER if you've never created a cluster in Personalized Search.
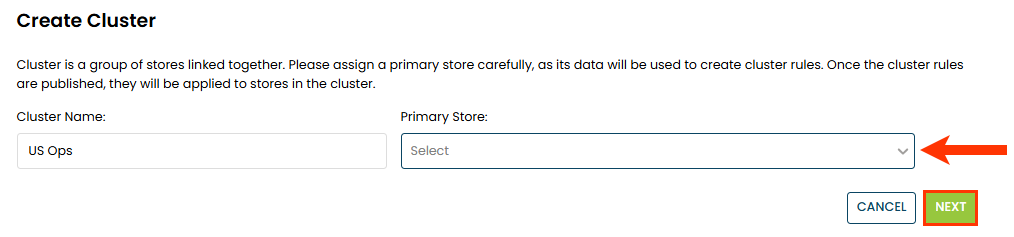
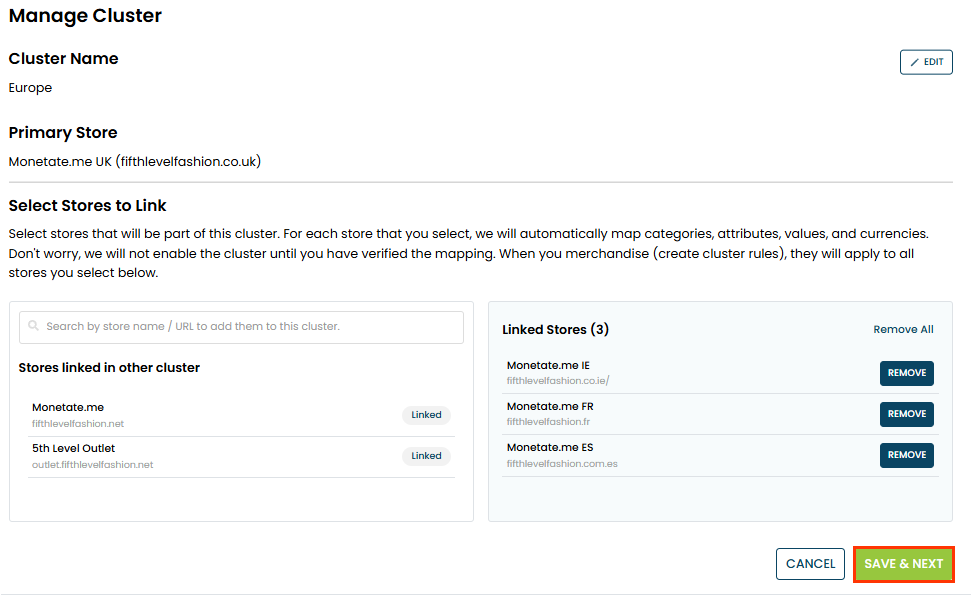
- Type a name into Cluster Name.
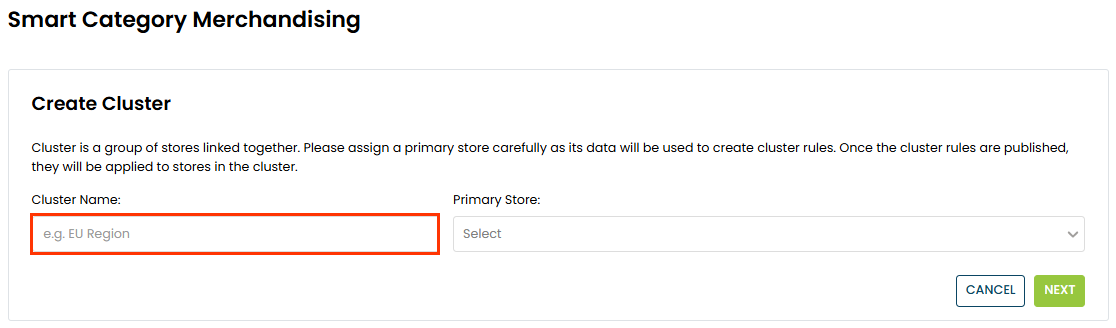
- Select from Primary Store the site that you want to be the source for default boosting rules, facet configurations, as well as pinned and excluded products settings and scheduled campaigns. Click NEXT.
- Click SELECT for each unlinked site listed in the left-hand column that you want to be part of the cluster.
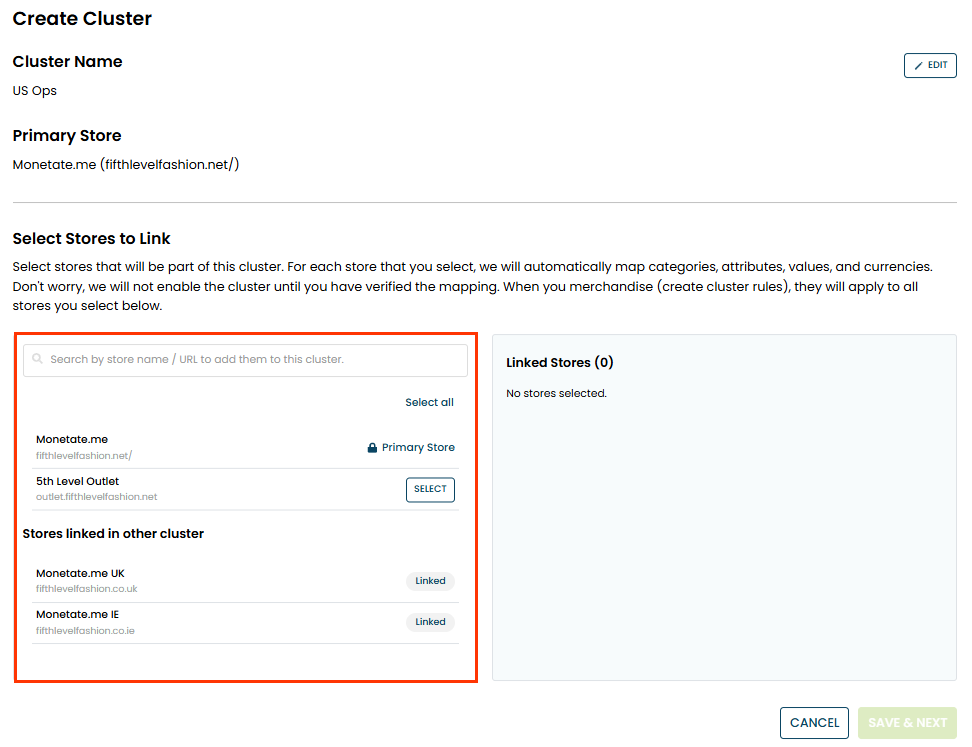
- Click SAVE & NEXT.

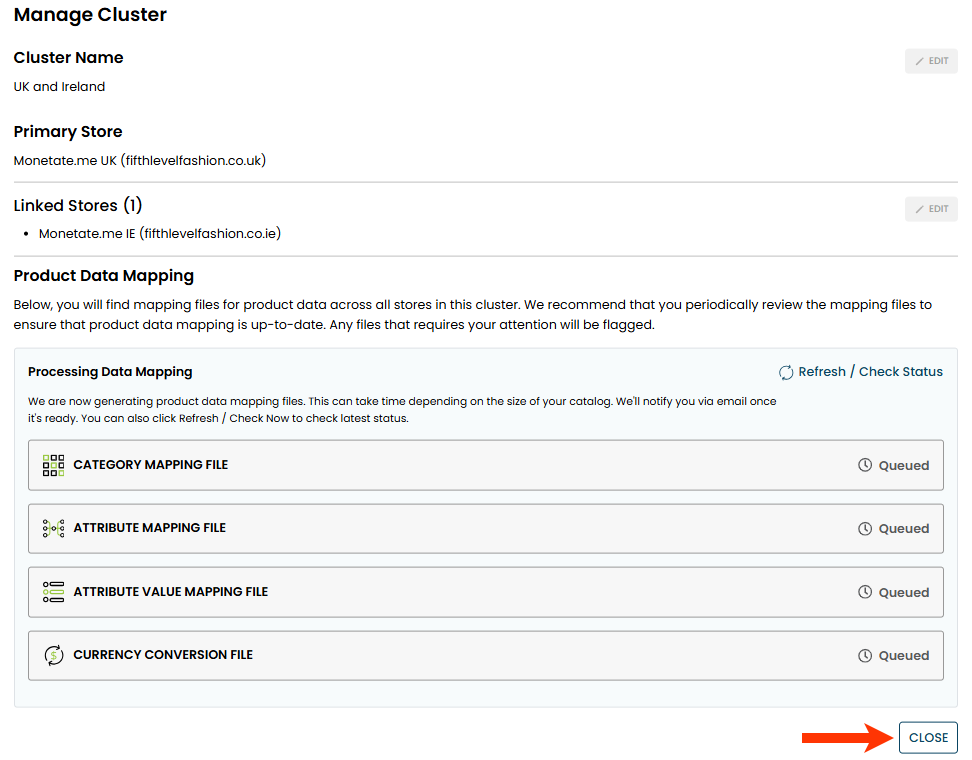
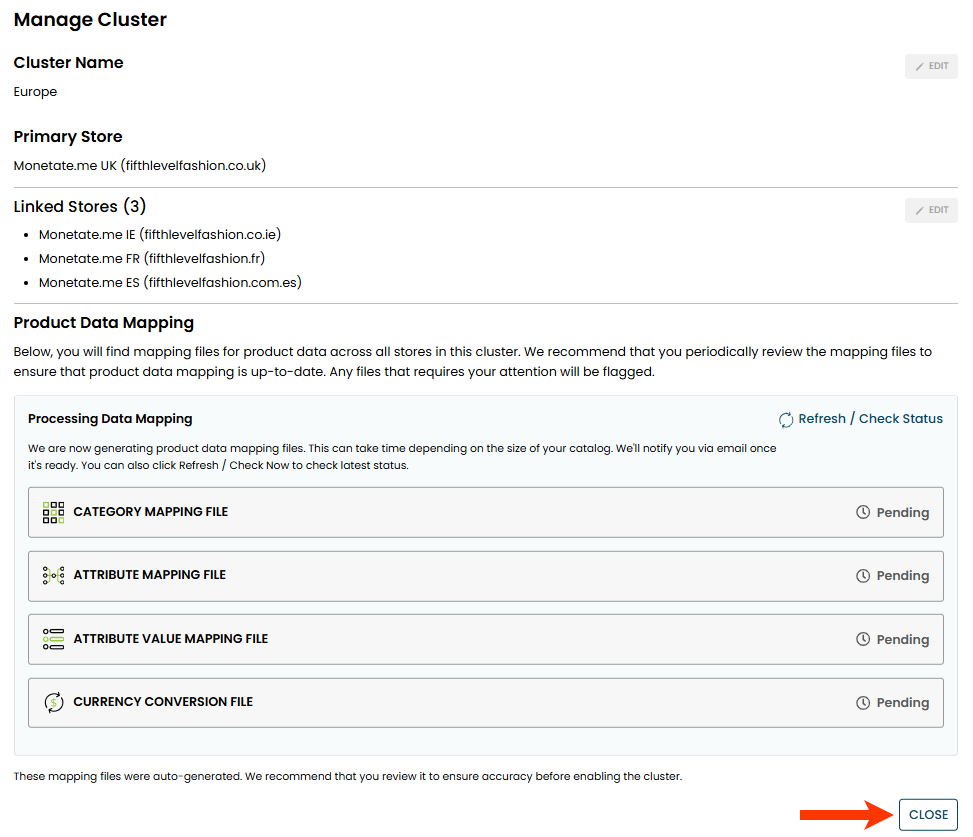
- Click CLOSE.
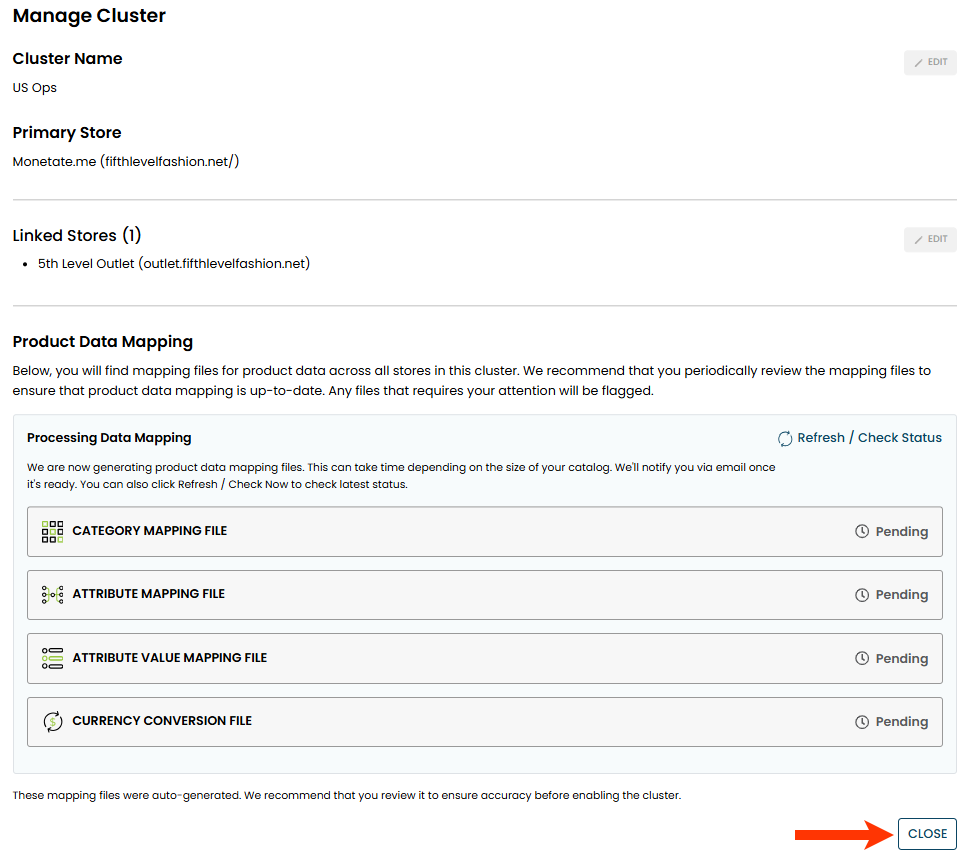
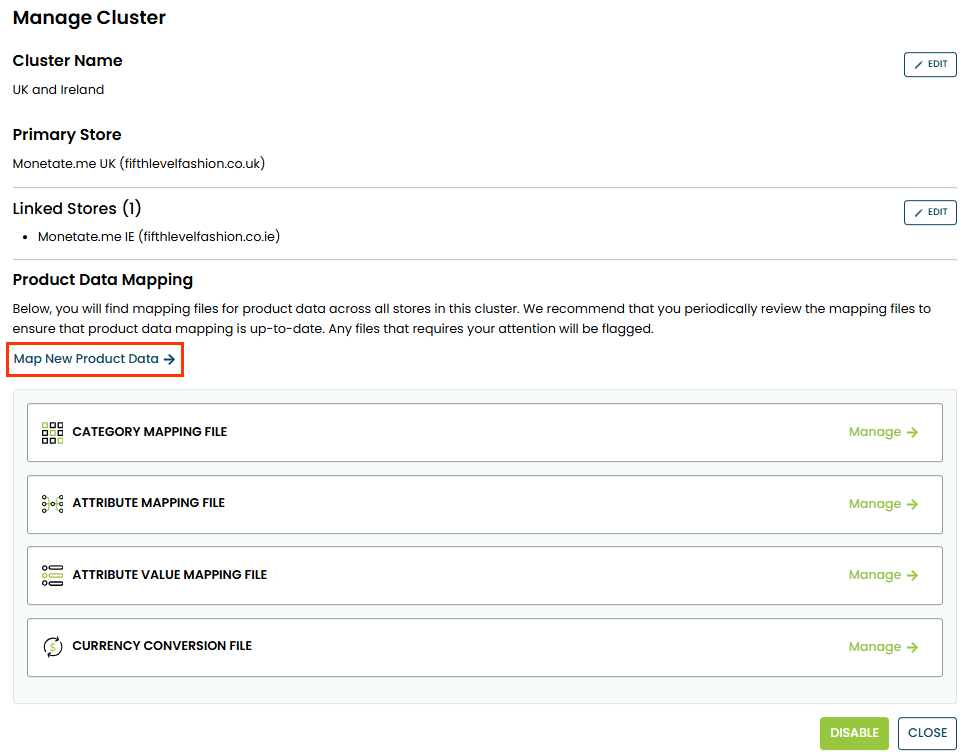
- After Personalized Search maps the product categories, attributes, attribute values, and currency that are in the primary site's product catalog to those in the linked site(s) product catalog(s), return to the Multi-Store Merchandising page, click the additional options menu (...) for the new cluster, and then select Manage.
- For each of the mapping files, click Manage and confirm that the mappings from the primary site to the linked site(s) are accurate.
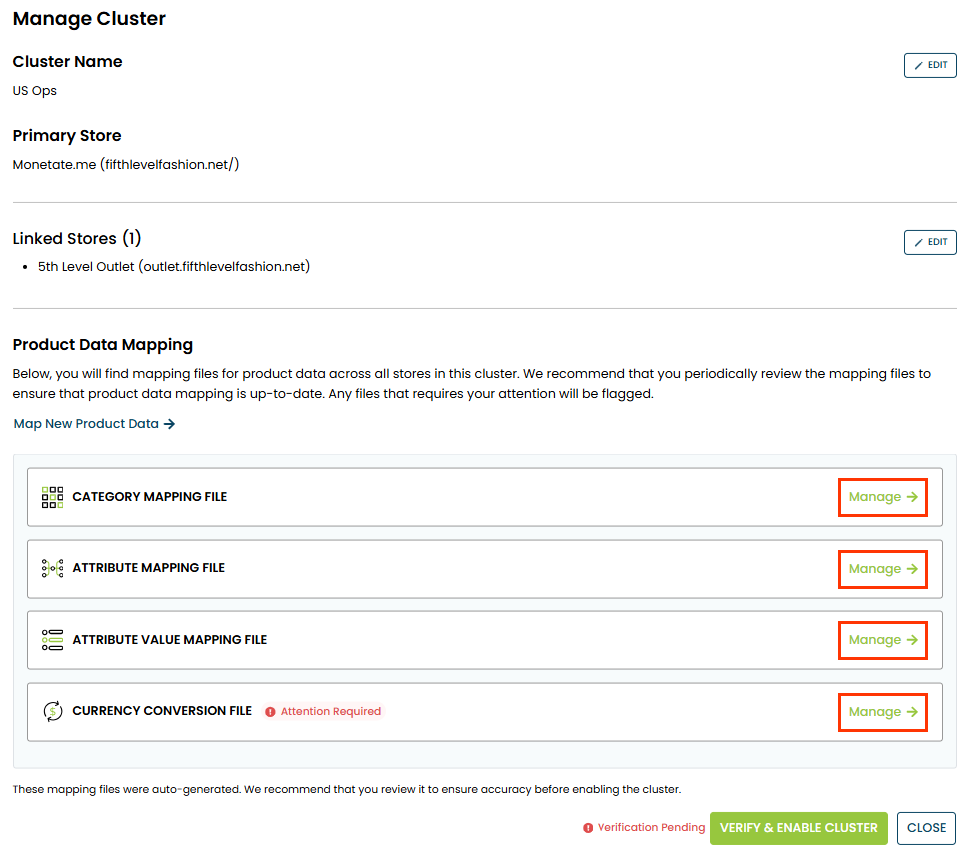
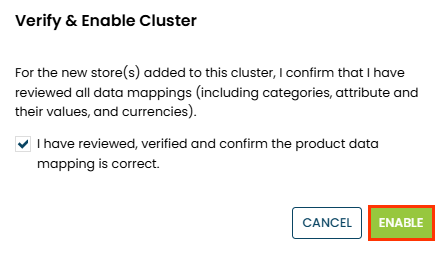
- Click VERIFY & ENABLE CLUSTER.
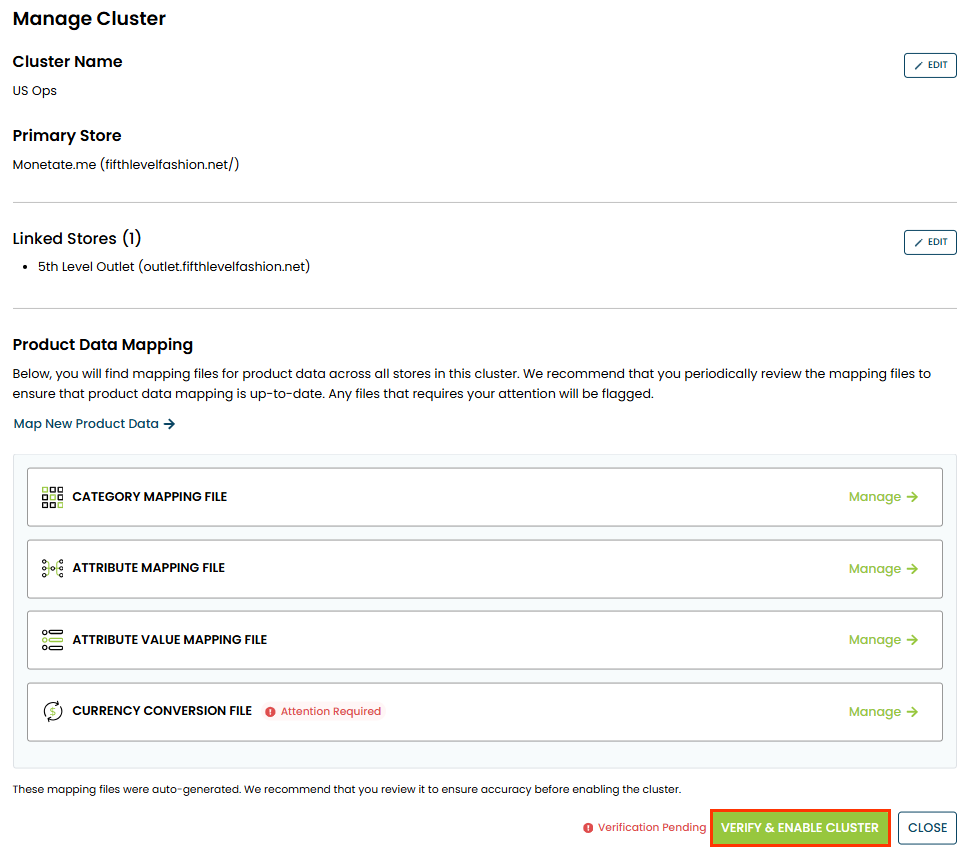
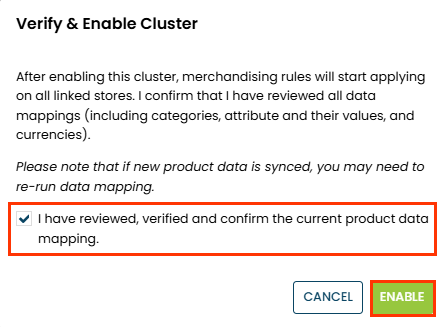
- Click the checkbox to acknowledge that you've reviewed, verified, and confirmed the current product data mapping, and then click ENABLE.
After you enable the cluster, Personalized Search applies the boosting rules, pinned and excluded products, facets, and scheduled campaigns in the primary site to all the linked sites. You must wait up to 20 minutes before you can see the changes on the linked sites.
You can disable a cluster at any time. On the Multi-Store Merchandising, click to toggle off the switch located to the left of the additional options menu (...), and then click DISABLE in the Disable Cluster modal that appears.
As soon as you disable a cluster, all its member sites revert to whatever rules you configured for them individually before you created the cluster.
Just as you can disable a cluster at any time, so too can you re-enable it to re-apply the cluster merchandising rules. Click to toggle the switch back to its enabled position, and then click ENABLE in the Disable Cluster modal that appears. You must wait up to 20 minutes before you can see the changes on the linked sites.
Managing Cluster Mapping Files
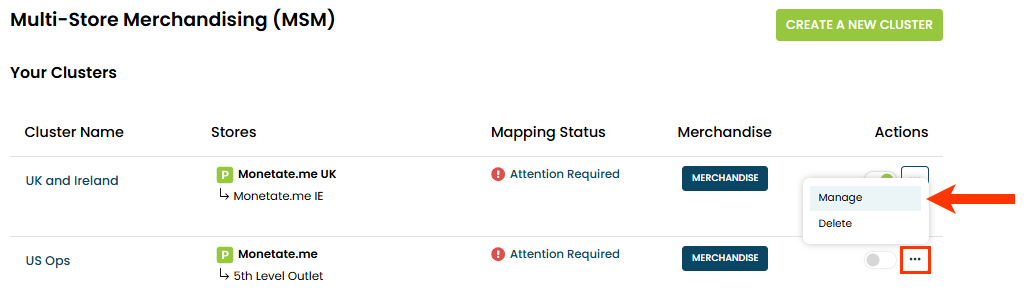
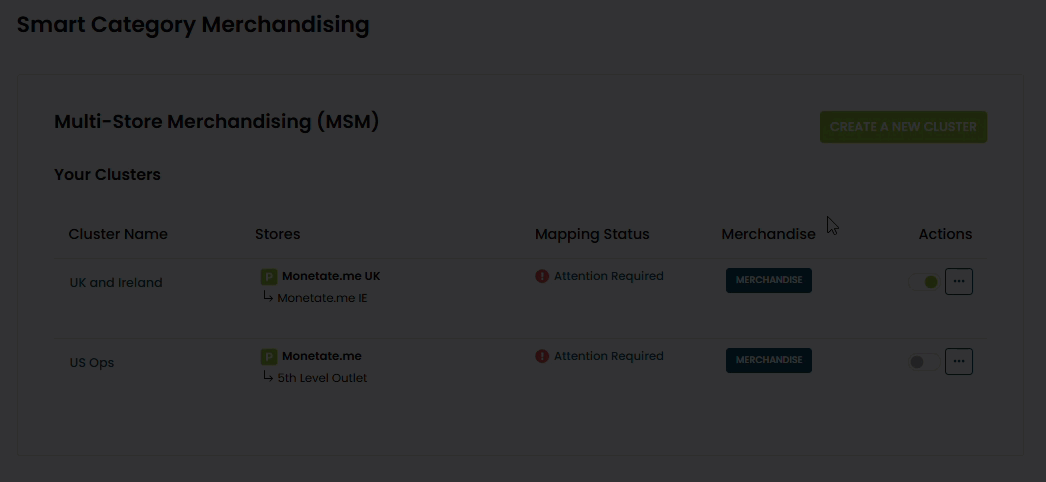
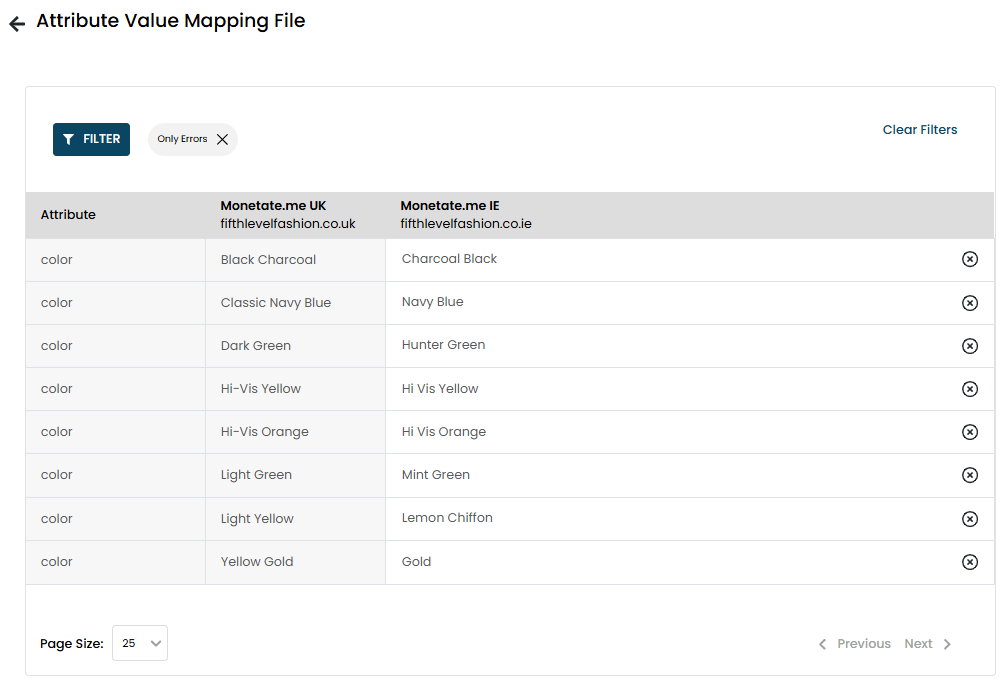
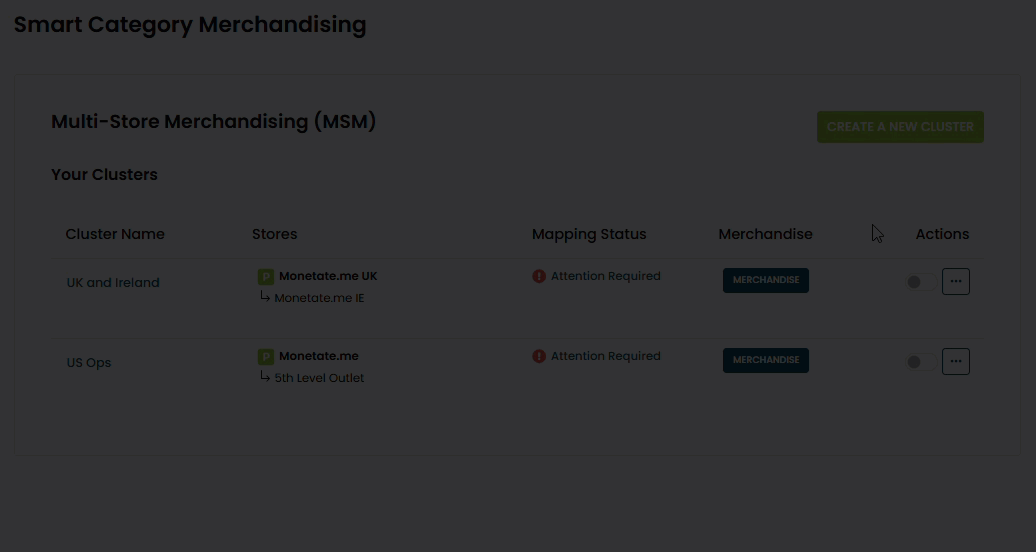
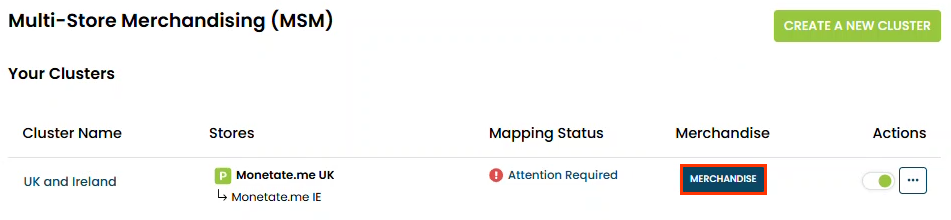
If Personalized Search was unable to map or match categories, attributes, attribute values, or currencies from a cluster's primary site to its linked site(s), then you see a Attention Required message in the Mapping Status column for the cluster's entry in the Your Clusters table on the Multi-Store Merchandising page.

Click that message to move to the Manage Cluster page, on which you see the same message for each mapping file that is missing one or more matches between a value in the primary site's product catalog and one or more linked sites.
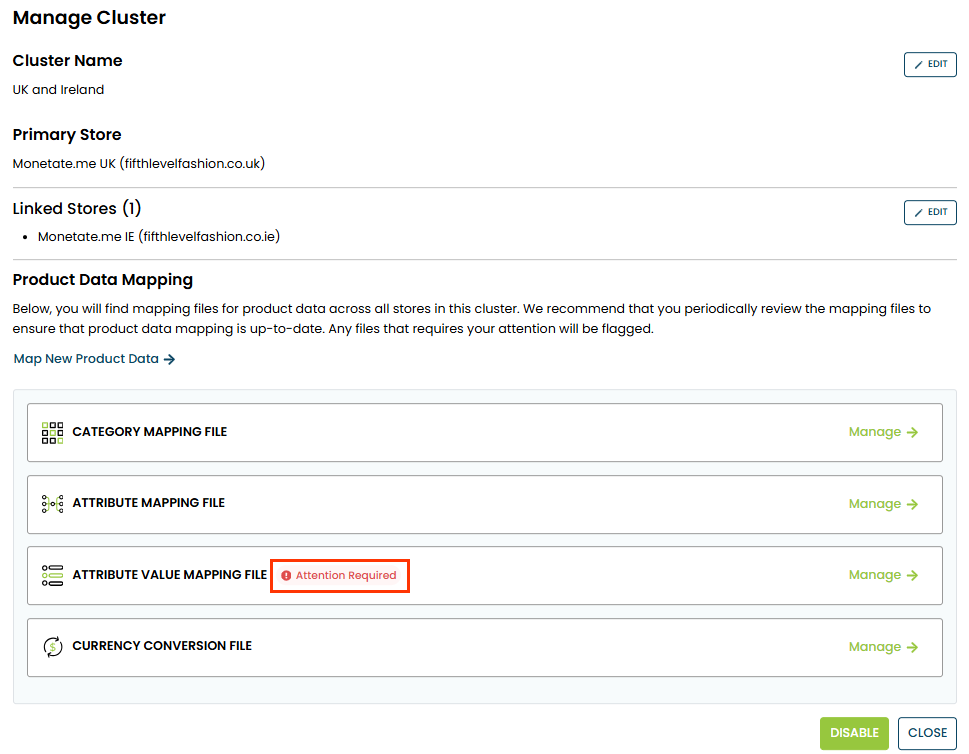
Follow these steps to resolve any issues in one of a cluster's mapping files.
- Click Manage.

- Click Attention Required in the upper-right corner of the mapping file's page.
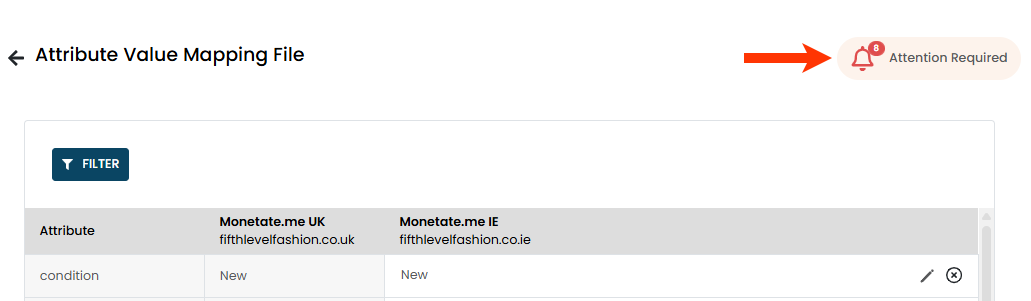
- Click Select Value for one of the rows in the errors table.
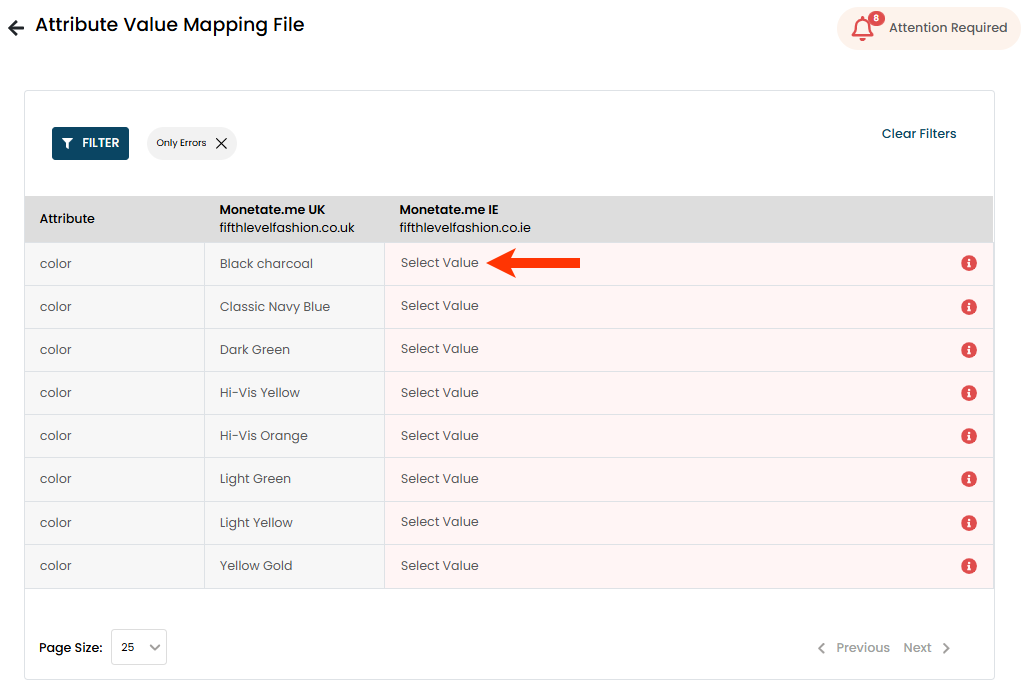
- Select an option that you want Personalize Search to map to its equivalent in the primary site's mapped product catalog.
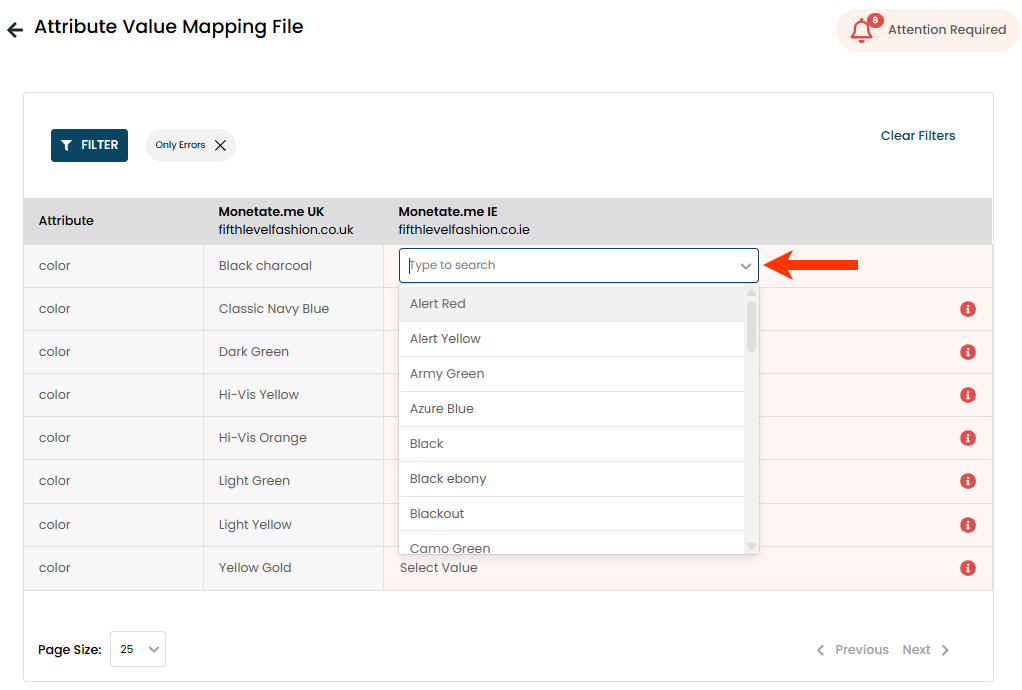
- Repeat steps 3 and 4 until you've either selected equivalents for all the missing mappings or determined the linked site doesn't have an equivalent in its mapped product catalog.
After you resolve the missing mappings, ensure that you enable the cluster if you haven't already done so. On the Multi-Store Merchandising page, click to toggle on the switch located to the left of the additional options menu (...), and then click ENABLE in the Enable Cluster modal that appears.
Refer to Merchandise a Cluster for the steps to create default rules and scheduled campaigns for the member sites.
Mapping New Product Data
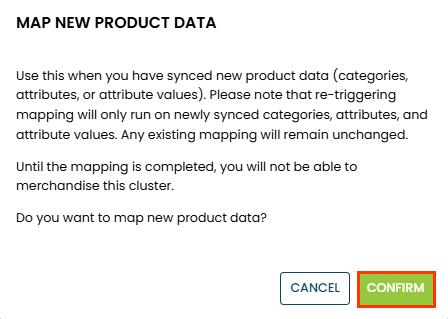
If you add new product categories, product attributes, or product attribute values to the product catalog for one or more of the sites in a cluster, then you must trigger an update of the cluster mappings. This action only looks for and maps new categories, attributes, and attribute values. Existing mappings that Personalized Search previously created as well as existing mappings that you manually revised remain unchanged.
Follow these steps to map new product data for a cluster.
- Click COMPONENTS in the top navigation bar, select Personalized Search, and then click the appropriate product catalog on the Personalized Search list page.
- Click the Smart Category Merchandising icon in the left-hand vertical toolbar, and then select Multi Store.
- Click the additional options menu (...) for the cluster, and then select Manage.
- Click Map New Product Data.
- Click CONFIRM in the MAP NEW PRODUCT DATA modal.
- Click CLOSE.
- After Personalized Search maps the new product data, return to the Multi-Store Merchandising page, click the additional options menu (...) for the cluster, and then select one of the following options:
- Select Manage if
Attention Requiredappears in the Mapping Status column for the cluster, and then rectify any missing or unmapped data, as necessary. See Managing Cluster Mapping Files for more information. - Select Re-apply Rules to update the cluster's merchandising rules with the updated mapping values.
- Select Manage if
- If you selected Manage in the previous step, then after you finish rectifying any missing or unmapped data, return to the Multi-Store Merchandising page, click the additional options menu (...) for the cluster, and then select Re-apply Rules.
You must wait up to 20 minutes before you can see changes related to the existing merchandising rules and the newly mapped product data on the cluster's sites.
Editing Cluster Membership
You can add or remove one or more linked sites to a cluster at any time without first disabling it.
Follow these steps to revise a cluster by adding one or more linked sites or by removing one or more linked sites.
- Click COMPONENTS in the top navigation bar, select Personalized Search, and then click the appropriate product catalog on the Personalized Search list page.
- Click the Smart Category Merchandising icon in the left-hand vertical toolbar, and then select Multi Store.
- Click the additional options menu (...) for the cluster, and then select Manage.
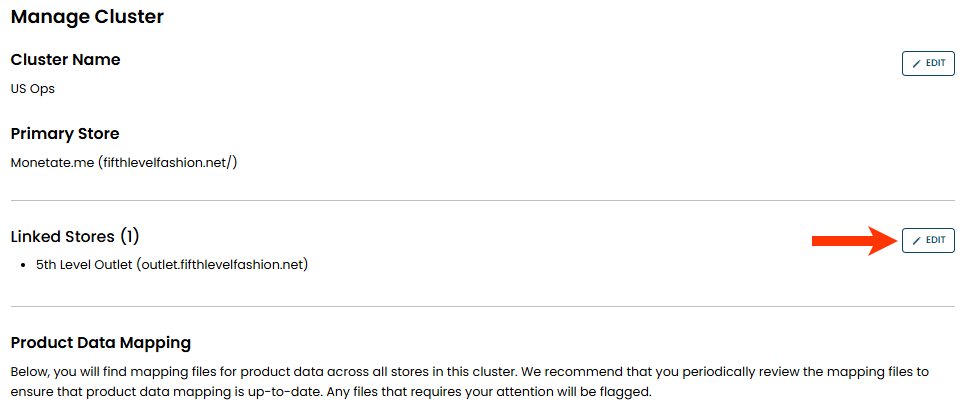
- Click EDIT in the Linked Stores section of the Manage Cluster page.
- Take one or both of the following actions as many times as necessary to revise the cluster:
- Click REMOVE to remove a linked site.
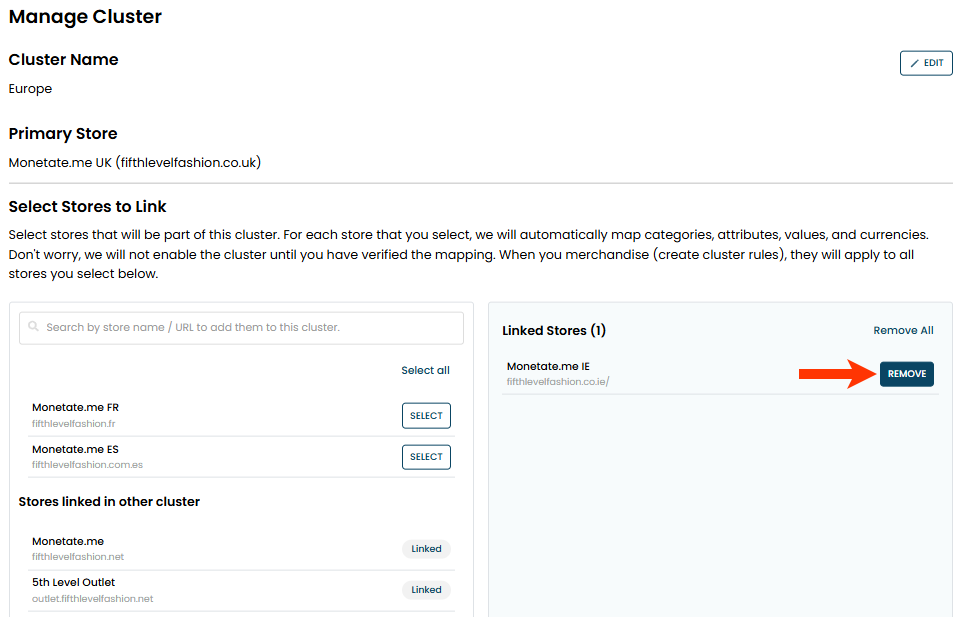
- Click SELECT to add an unlinked site to the cluster.
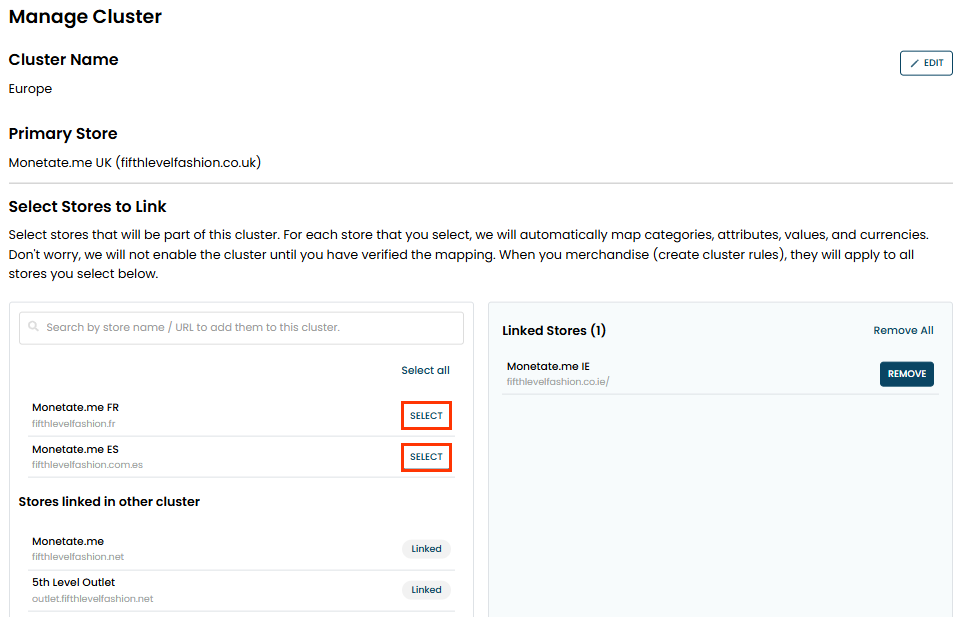
- Click REMOVE to remove a linked site.
- Click SAVE & NEXT.
- Click CLOSE.
- If you added one or more sites to the cluster, return to its Manage Cluster page after Personalized Search finishes updating the mapping files with the data from the newly linked site(s) product catalog(s), and then confirm that the mappings from the primary site to the newly linked site(s) are accurate. Follow steps 10 through 12 in Creating a Cluster to complete this process.
If you added one or more sites to the cluster, Personalized Search applies the boosting rules, pinned and excluded products, facets, and scheduled campaigns in the primary site to the newly linked sites. You must wait up to 20 minutes before you can see the changes on those newly linked sites.
If you remove one or more sites from the cluster, then each site reverts to using their respective default boosting rules, facet configurations, pinned and excluded products settings, and scheduled campaigns that you'd set up before you made the site(s) part of the cluster. If you had not configured these settings for a formerly linked site and you don't plan to add it immediately to a different cluster, then following the guidance in Manage Facets for Category Pages, Boost or Bury Products on Category Pages, Pin Products on Category Pages, and Exclude Products from Category Pages to configure these settings. Alternatively, you can import boosting rules, pinned products, and excluded products from another site but must still customize the facets in the recipient account.
Merchandising a Cluster
After you set up a cluster, you can apply consistent default boosting rules, pinned and excluded products, facets, and scheduled campaigns across all the cluster's member sites.
Prerequisites
You cannot merchandise at the cluster level any unmapped categories, attributes, or attribute values. Refer to Managing Cluster Mapping Files for more information about mapping the missing data. If you're unable to map the missing data yourself so that it's included in the cluster-level merchandising rules you're configuring, then you can only merchandise those unmapped entities by creating a scheduled campaign at the site level that overrides all the cluster-level rules.
Furthermore, if any site in the cluster has an active scheduled campaign, then it takes priority over cluster-level merchandising. When the active site-level scheduled campaign ends, then Personalized Search applies the relevant cluster-level merchandising rules or scheduled campaigns.
Keep this heirarchy of merchandising rules in mind:
- Cluster-level default rules apply if no other rules exist
- Cluster-level scheduled campaigns override cluster-level default rules for all linked sites
- A site-level scheduled campaign supersedes cluster-level default rules for that site
Configuring Cluster-Level Default Rules
Follow these steps to configure default boosting rules, pinned and excluded products, as well as facets for a cluster.
- Click COMPONENTS in the top navigation bar, select Personalized Search, and then click the appropriate product catalog on the Personalized Search list page.
- Click the Smart Category Merchandising icon in the left-hand vertical toolbar, and then select Multi Store.
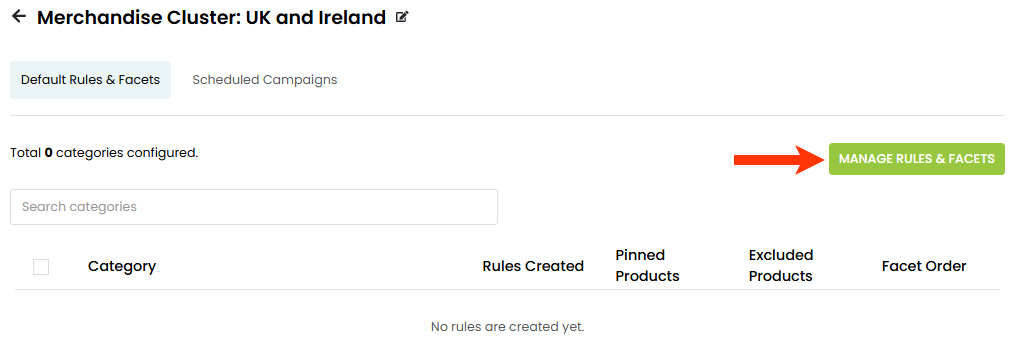
- Click MERCHANDISE for the cluster.
- Click MANAGE RULES & FACETS.
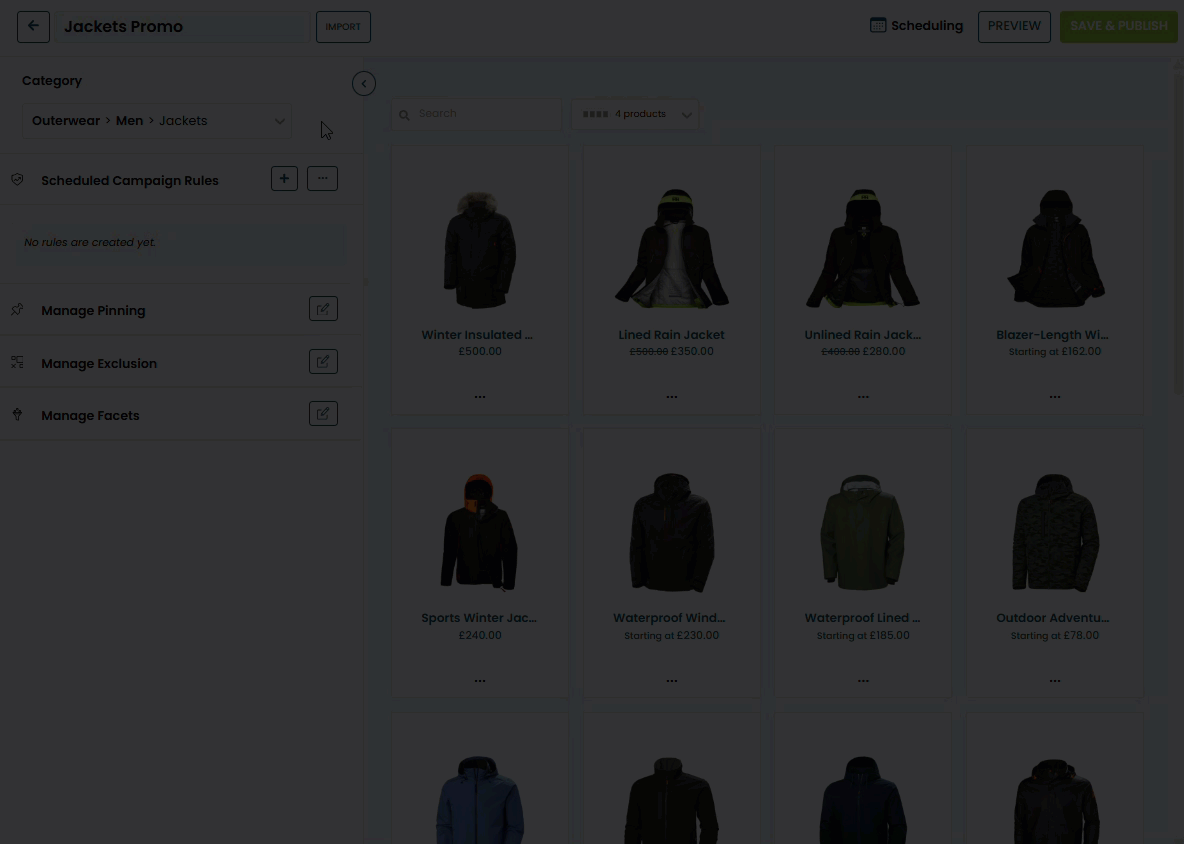
Once you're on the Cluster Default Rules page, you can follow the steps in the appropriate documentation to configure the rules and settings as necessary:
- Steps 4 through 9 of Setting a Default Boosting Rule with Single-Attribute Conditions or of Setting a Default Boosting Rule with Conditions Combinations in Boost or Bury Products on Category Pages
- Steps 4 through 11 of Setting a Facets Rule in Manage Facets for Category Pages
- Steps 4 through 11 of Pinning Products for a Category in Pin Products on Category Pages
- Steps 4 through 9 of Excluding Products from a Category in Exclude Products from Category Pages
You must wait up to 10 minutes before you can see the impact of the default rules and facets that you have configured on their targeted category pages if they are not superseded by one or more active site-level scheduled campaigns.
Configuring a Cluster-Level Scheduled Campaign
Follow these steps to configure a cluster-level scheduled campaign.
- Click COMPONENTS in the top navigation bar, select Personalized Search, and then click the appropriate product catalog on the Personalized Search list page.
- Click the Smart Category Merchandising icon in the left-hand vertical toolbar, and then select Multi Store.
- Click MERCHANDISE for the cluster.
- Click the Scheduled Campaigns tab, and then click CREATE NEW.
- Follow steps 4 through 15 in Create Scheduled Campaigns.
If you previously created cluster-level default boosting rules for the selected category and want to use them in the scheduled campaign, then click the additional options menu (...) for Scheduled Campaign Rules, select Copy Default Rules, select the boosting rules you want to copy into the campaign, and then click COPY.
You can edit a campaign even when it's active. After you click SAVE & PUBLISH after completing the revisions, you must wait up to 10 minutes before you can see the impact of the changes on the cluster's member sites.