Request Requirements
When an Engine API request is made, Monetate's decision engine evaluates all active Omnichannel experiences in the account and uses the provided context to make decisions about which experiences and actions for which the customer has qualified.
All Engine API requests must be made via a POST request and include the following:
- Endpoint
- Content-type header
- Body
Endpoint
The endpoint to which Engine API requests are made is
https://engine.monetate.net/api/engine/v1/decide/{retailer_shortname}The {retailer_shortname} placeholder is a unique identifier that specifies the parent value of the account. This identifier is provided by your dedicated Services team.
A subsequent channel attribute is required within the request body that specifies the account, domain, and instance (for example "channel": "a-887f2483/p/example.com").
Content-Type Header
The content-type header is required and may be set to either application/JSON or text/plain.
Monetate recommends text/plain to avoid an extra round trip (the CORS preflight OPTIONS request associated with application/JSON).
Body
The body of an Engine API request consists of JSON that identifies the account and passes page- and user-level data via events.
Events in a Request
Each of the three event types instructs the Engine API to do different things with the associated information:
- Event types that begin with
monetate:decisionrequest that the Engine API evaluate active experiences and return actions - Event types that begin with
monetate:contextprovide information about the visitor or page that Monetate uses for targeting and decision-making purposes - Event types that begin with
monetate:recordprovide information that Monetate should record but that isn't used for targeting or decision-making purposes
All Engine API requests should follow the same structure as noted in the technical documentation. However, including various API models depends on individual integrations and use cases.
- Include the
pageTypeparameter within themonetate:context:PageViewmodel to use corresponding action conditions - Include the
monetate:context:ProductThumbnailViewevent to communicate all items present on a listing page or search results page, which can then be used for action conditions or advanced recommendations use cases - Include the
monetate:context:ProductDetailViewevent to communicate a product view has occurred and subsequently target/condition based on a specific product, brand, product type/category, or advanced recommendations use cases - Include the
monetate:context:Cartevent to communicate cart contents which are used for behavioral analytics and cart-content targets or action conditions - Include the
monetate:context:Purchaseevent to communicate a purchase has occurred for behavioral analytics and purchase
See Target, Event, & Condition Mapping for more extensive mapping of Engine API models and how you can use them for targeting and action conditions in experiences and actions.
User Identity Persistence
Monetate identifies anonymous visitors and tracks behavior via a monetateId. This ID is generated on the first request to the platform if it's not already present and identifies a unique device or browser.
Monetate Tag
In a traditional Monetate tag implementation, monetateId is set as a first-party cookie, mt.v. It persists for future site visits.
For Engine API implementations, Monetate generates monetateId if no identifier is passed in the request.
Hybrid Engine API
For hybrid Engine API implementations, where the Monetate tag is also running on the site, ensure that you do the following:
- If a
monetateIdexists in themt.vcookie, then you must pass it in all Engine API requests. - If no existing
monetateIdis present in amt.vcookie, then you must ensure that themonetateIdgenerated by the initial Engine API request is set as a first-party cookie namedmt.v(case sensitive).
These user identity measures allow Monetate to reconcile information collected by both the Engine API and Monetate tag into a single unified session.
Contact your dedicated Customer Success Manager (CSM) if you need assistance with these steps.
Pure Engine API
For pure Engine API implementations (such as pure SSI or mobile apps), Monetate has no way to set the mt.v cookie. Therefore, the requesting application is responsible for keeping track of the monetateId by setting the cookie or otherwise storing or maintaining the persistence of the value by other means unique to your application.
If a device ID is available that can uniquely identify the customer's device across requests, then you can alternatively include deviceId in all Engine API requests. This value then acts as a unique identifier and allows Monetate to track visitor behavior throughout the current session and across future sessions.
monetateId— Can be used for app but would be stored in a variable on your end.deviceId— Can be used as an alternative tomonetateIdto uniquely identify the site visitor's device across requests. If used, it doesn't need to be stored. This value acts as a unique identifier and allows Monetate to track visitor behavior throughout the current session as well as across future sessions.
monetateId Sample Requests and Responses
New Visitor Request
In this example of a New Visitor request, no monetateId is being sent.
{
  "channel": "a-12345678/d/example.test",
  "events":
  [
    {
      "eventType": "monetate:decision:DecisionRequest",
      "requestId": "11111"
    },
    {
      "eventType": "monetate:context:IpAddress",
      "ipAddress": "127.0.0.1"
    },
    {
      "eventType": "monetate:context:PageView",
      "url": "https://www.example.test/path"
    }
  ]
}
New Visitor Response
This example New Visitor response includes a monetateId.
{
  "meta":
  {
    "code": 200,
    "monetateId": "5.977810341.1521134874631"
  },
  "data":
  {
    "responses":
    [
      {
        "requestId": "11111",
        "actions":
        [
          {
            "data":
            {
              "example": "json"
            },
            "actionType": "monetate:action:OmniJson"
          }
        ]
      }
    ]
  }
}
Returning Visitor Request
A monetateId is being sent in this example of a Returning Visitor request.
{
  "channel": "a-12345678/d/example.test",
  "monetateId ": "5.977810341.1521134874631",
  "events":
  [
    {
      "eventType": "monetate:decision:DecisionRequest",
      "requestId": "11111"
    },
    {
      "eventType": "monetate:context:IpAddress",
      "ipAddress": "127.0.0.1"
    },
    {
      "eventType": "monetate:context:PageView",
      "url": "https://www.example.test/path"
    }
  ]
}
Returning Visitor Response
This code is the response to the Returning Visitor request.
{
  "meta":
  {
    "code": 200
  },
  "data":
  {
    "responses":
    [
      {
        "requestId": "11111",
        "actions":
        [
          {
            "data":
            {
              "example": "json"
            },
            "actionType": "monetate:action:OmniJson"
          }
        ]
      }
    ]
  }
}
deviceId Sample Requests and Responses
New Visitor Request
In this example New Visitor request, the deviceId is passed instead of monetateId. In this case, it would be a New Visitor request because Monetate hasn't seen this deviceID before.
{
  "channel": "a-12345678/d/example.test",
  "deviceId ": "39hu7lgj05454nj5t4",
  "events":
  [
    {
      "eventType": "monetate:decision:DecisionRequest",
      "requestId": "11111"
    },
    {
      "eventType": "monetate:context:IpAddress",
      "ipAddress": "127.0.0.1"
    },
    {
      "eventType": "monetate:context:PageView",
      "url": "https://www.example.test/path"
    }
  ]
}
New Visitor Response
In this New Visitor response example, the deviceId isn't returned. The monetateId is still returned, which can be ignored in this instance.
{
  "meta":
  {
    "code": 200,
    "monetateId": "5.977810341.1521134874631"
  },
  "data":
  {
    "responses":
    [
      {
        "requestId": "11111",
        "actions":
        [
          {
            "data":
            {
              "example": "json"
            },
            "actionType": "monetate:action:OmniJson"
          }
        ]
      }
    ]
  }
}
Returning Visitor Request
If the same deviceId is sent again, Monetate recognizes it and classifies it as a Returning Visitor.
{
  "channel": "a-12345678/d/example.test",
  "deviceId ": "39hu7lgj05454nj5t4",
  "events":
  [
    {
      "eventType": "monetate:decision:DecisionRequest",
      "requestId": "11111"
    },
    {
      "eventType": "monetate:context:IpAddress",
      "ipAddress": "127.0.0.1"
    },
    {
      "eventType": "monetate:context:PageView",
      "url": "https://www.example.test/path"
    }
  ]
}
Returning Visitor Response
As with the New Visitor response, note that the deviceId isn't returned in this Returning Visitor response.
{
  "meta":
  {
    "code": 200,
    "monetateId": "5.977810341.1521134874631"
  },
  "data":
  {
    "responses":
    [
      {
        "requestId": "11111",
        "actions":
        [
          {
            "data":
            {
              "example": "json"
            },
            "actionType": "monetate:action:OmniJson"
          }
        ]
      }
    ]
  }
}
Custom Variable Request
The deviceId and a custom variable can be passed in the request to let the Engine know that this is either a new or returning visitor.
{
  "channel": "a-12345678/d/example.test",
  "deviceId ": "39hu7lgj05454nj5t4",
  "events":
  [
    {
      "eventType": "monetate:decision:DecisionRequest",
      "requestId": "11111"
    },
    {
      "eventType": "monetate:context:IpAddress",
      "ipAddress": "127.0.0.1"
    },
    {
      "eventType": "monetate:context:CustomVariables",
      "customVariables":
      [
        {
          "variable": "Returning_Visitor",
          "value": "True"
        }
      ]
    },
    {
      "eventType": "monetate:context:PageView",
      "url": "https://www.example.test/path"
    }
  ]
}
When deviceId is first sent, all visitors are classified as new. When using custom variables, that is sent in addition to the deviceId to ensure that new visitors are being targeted.
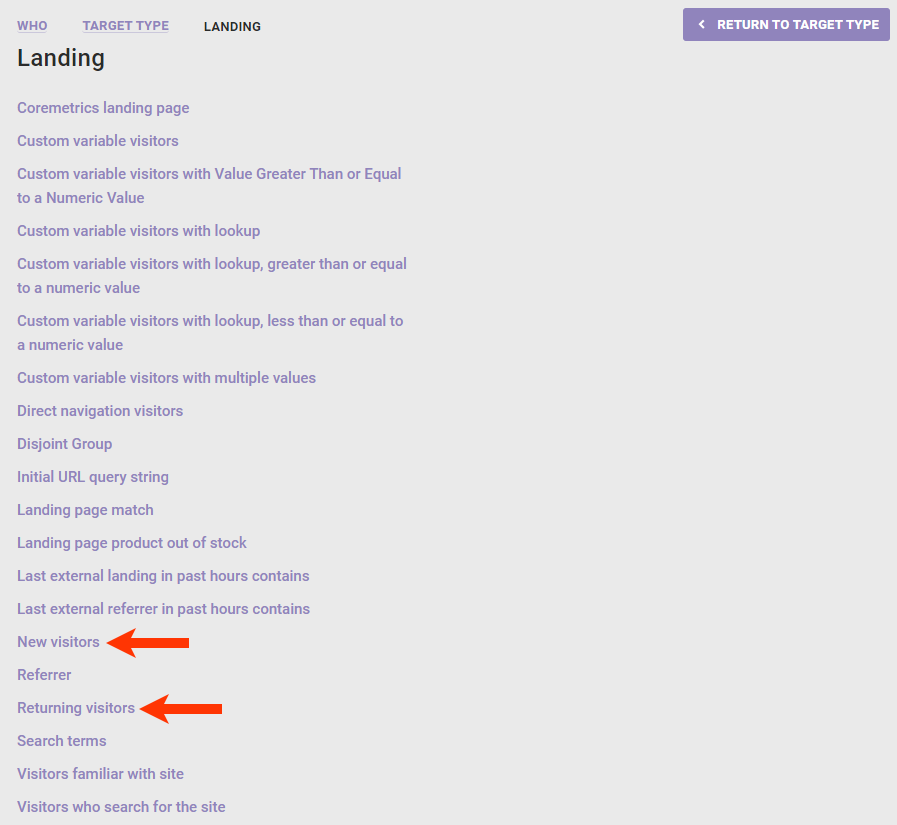
Targeting New and Returning Visitors with deviceId and Custom Variables
Use the Custom variable visitors option in the Landing target type to target new and returning visitors.
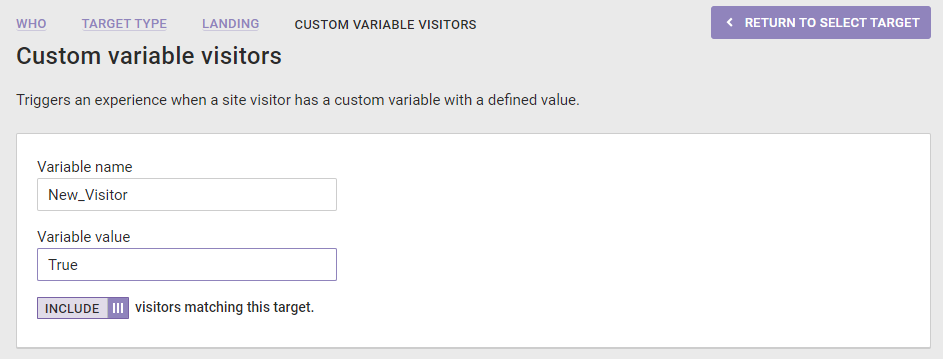
You can also use the New visitors and Returning visitors options in the Landing target type instead of custom variables.
Identifying Known Customers (Customer Datasets)
A customerId can be provided for logged-in users of your application. This ID identifies someone in, for example, a loyalty program. It's associated with the identified device and allows you to use your own data, uploaded to Monetate as a dataset, for targeting and context.
For Customer Datasets
{
  "channel": "a-1d121c07/p/monetate-api.myshopify.com",
  "monetateId": "5.1824559023.1570975471014",
  "customerId": "123abc",
  "events": [
    {
...For Customer Attributes Datasets
If you have a Customer View enabled and have a different type of customer identifier, then continue to send customerId for the Customer View and send the Customer Attribute dataset's Identifier Name, which you can find on the Customer Attributes view of the Datasets list page, via a custom variable. You don't need to add the custom variable value for the Identifier Name to an experience.
{
  "channel": "a-1d121c07/p/monetate-api.myshopify.com",
  "customerId": "123abc",
  "events": [
    {
      "eventType": "monetate:context:CustomVariables",
      "customVariables": [
        {
          "variable": "LoyaltyId",
          "value": "1234"
        }
      ]
    }
  ]
}
Customer Views
It's possible to have a single view of a customer across mobile, desktop, and apps as long as the customerId is the same. This stitches together the behavioral data for the customer for the corresponding behavioral targets supported by Customer Views.
How this works for Web is that if there's a match on the customerId, then the same experience is guaranteed for customer A.
For app/Engine API-only experiences, contact the Services team to set up an ID Collector. If your account already has an ID Collector set up for Web, then provide the name so that it can be copied to the app accounts.
Client-side developers must do the following:
- Create an Omnichannel experience with the Omni JSON action matching the desktop experience to ensure that the customer sees the same visual change.
- Pass a
customerIdin the request along with all relevant or identical target information as context.
The Engine API responds to the request with the eligible experiences.
Context vs Events (KPIs/Metrics)
Information sent to Monetate generally falls into two categories: context and events (KPIs/metrics used for analytics).
Contextual information (such as geographic and technographic information or custom variables) is determined per session and can safely be sent multiple times (by both the Monetate tag and Engine API, for example) with no effect on analytics.
Events can potentially be recorded by both the Monetate tag and Engine API in hybrid implementations. However, be aware of the following:
- API events are recorded at the session level for experience analytics, but the aggregate count (how many times the event occurred) can be seen within raw data.
- Product views are recorded individually but are only used for processing recommendation algorithms. What matters is if a product was viewed in a session, not how many times it was viewed.
- The Most Viewed (Product Detail Page) recommendation algorithm could be influenced by multiple views in a given session.
- Collaborative recommendation algorithms, such as Viewed and Also Viewed and Purchased and Also Purchased, aren't effected by multiple views in a given session and solely function based on whether a product was viewed in a session.
- Cart events are recorded as an event, and Monetate considers the most recent event for behavioral purposes. For this reason, even for traditional Monetate tag-based implementations, properly recording all applicable cart items on every track is important.
- Purchases are recorded individually but are deduplicated by the
purchaseIdvalue. If a Monetate tag-based integration and Engine API integration report the samepurchaseId, then only one is recorded. - Page views aren't currently supported by the Engine API. As a result, average page views and bounce rate metrics cannot be calculated for Omnichannel experiences.
Custom Events
You can send any event, such as clicks and impressions, that falls outside of Monetate's built-in events using monetate:record:PageEvents.
{
  "eventType": "monetate:record:PageEvents",
  "pageEvents":
  [
    "myEvent"
  ]
}
The list of events sent can be any event configured in Monetate by following the steps in Creating a Custom Engine API Event in this documentation. These events are identified in the API by their Unique Key, an alphanumeric string set when you create the event. You can't use monetate:record:PageEvents to send an event that doesn't have a Unique Key.
You can configure any event to have a Unique Key. Requests referencing this key from the time the key is set result in that event being sent to Monetate. When one or more of these events are sent via the Engine API, they're recorded within Monetate as having occurred for the customer at the time sent. For example, in the previous example monetate:record:PageEvents request, an event with the Unique Key myEvent is being sent. This value was set using the Unique Key field in the Create Engine API Event modal.
A number of rules govern the functionality of Unique Keys. As its name implies, each key must be unique and can only be used if it actively references the event in question. You can't set a key retroactively but you can change it. If you send a Unique Key in a monetate:record:PageEvents request before you create the key, then the Unique Key is ignored. The Engine API also ignores any Unique Key value in a request that no longer references an event, such as when an Unique Key is changed.
Custom events are useful for reporting and for use as goal metrics in Monetate experiences.
Creating a Custom Engine API Event
Follow these steps to create a custom Engine API event in the Monetate platform.
- Click COMPONENTS in the top navigation bar and then click Events.

- Click the arrow to the right of CREATE EVENT and then select Create Engine API Event.

- Take the following actions in the Create Engine API Event modal:
- Give the event a title and description.
- Enter into Unique Key the value to be sent when this event occurs.
- Leave API as the selected option for Category.
- Optionally, enter a subcategory.
- Optionally, add any action conditions.
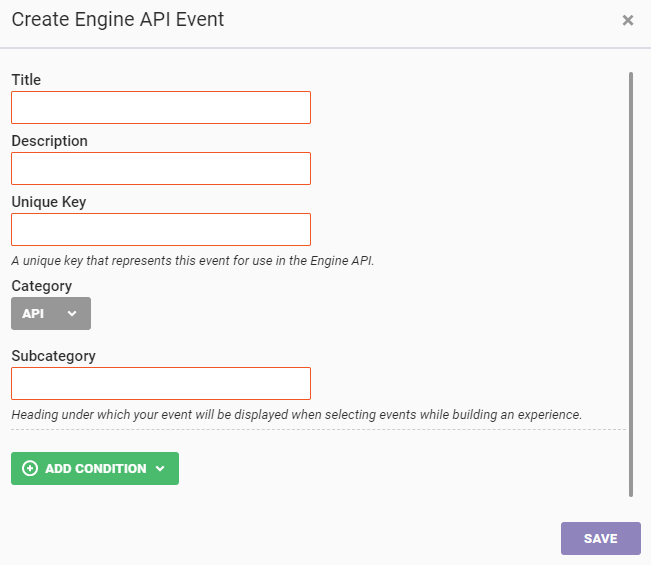
- Click SAVE.
When the event is satisfied by a site visitor, send a data request containing the Unique Key that you input for the custom event.
{
"eventType": "monetate:record:PageEvents",
"pageEvents":
[
"myEvent"
]
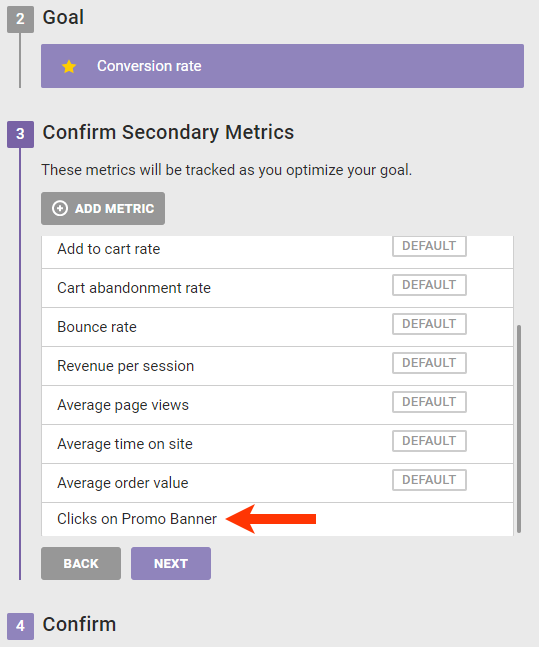
}You also must add the custom Engine API event to the WHY settings of an Omnichannel experience as a secondary metric. See steps 5 and 6 in Add Custom Metrics to an Experience to add and select the event in the Experience Editor.
Managed Impressions
By default, when a monetate:decision:DecisionRequest is made and an action is returned as part of the Engine API response, an impression is recorded for that action at decision time.
In some situations additional front-end logic must be applied for a site visitor to qualify for a particular action, such as expanding a navigation bar to see additional options. In cases such as this one, you can use a managed_impressions action.
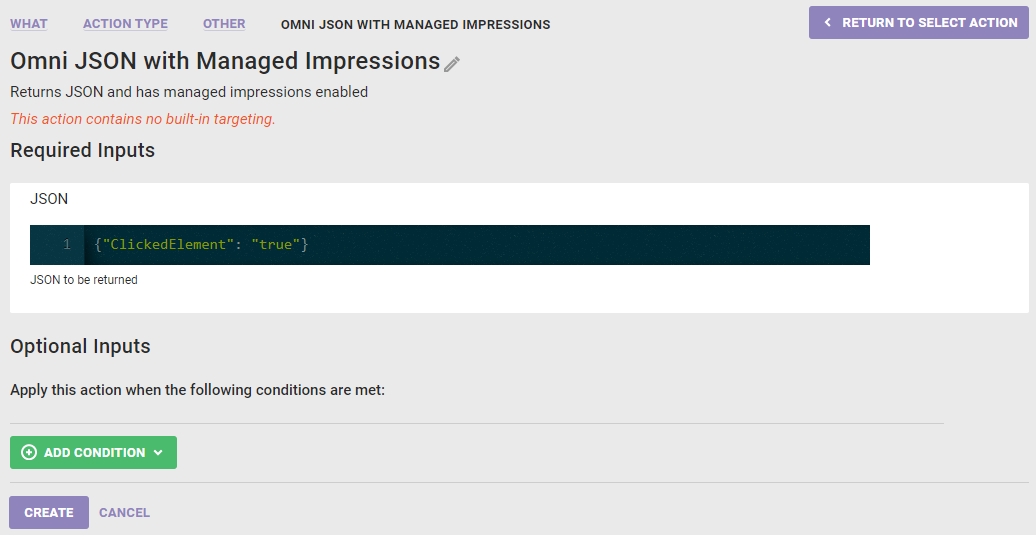
Action templates support a managed_impressions flag. When this flag is set to true, the action isn't recorded at decision time.
This flag allows you to set additional action conditions beyond those Monetate is able to evaluate. Even without action conditions, it allows the caller to detect the actual visibility of the action and record its impression accordingly.
For example, an action may adjust the display of options in a drop-down menu, but the site visitor must first click the menu to become eligible to see the action. This screenshot shows the Omni JSON Managed Impression action template configured for this scenario.
When you make a request to the Engine API, the initial response contains the experience with managed impression action and a unique impressionId for the visitor in the session.
Code Samples
Initial Response for Recording Impressions
{
  "meta":
  {
    "code": 200,
    "monetateId": "5.977810341.1521134874631"
  },
  "data":
  {
    "responses":
    [
      {
        "requestId": "11111",
        "actions":
        [
          {
            "impressionId": "2.MTY3MTE3Ni4xLjE2MjE0MjcyODE",
            "json":
            {
              "ClickedElement": "true"
            },
            "actionType": "monetate:action:OmnichannelJson",
            "actionId": 3813493,
            "isControl": true
          }
        ]
      }
    ]
  }
}
Each action returned in the response includes two additional fields:
- The
impressionIdfield contains an encoded string that must be passed back to Monetate when the site visitor qualifies for all front-end conditions associated with the action (for example, the visitor has clicked a drop-down menu and is now eligible to see an action that modifies options within the menu). - The
isControlfield is a Boolean value that indicates whether the site visitor has been assigned to the control group for the action. Regardless of whetherisControl=true, theimpressionIdvalue should be reported back to Monetate once the visitor meets all eligibility criteria. However, ifisControl=truethen the action doesn't display for the visitor.
Once a site visitor meets all eligibility criteria, the impressionId value must be reported back to Monetate so that it can record the impression. The same monetateId or deviceId used in the initial request must be passed when recording impressions so that they can be associated with the visitor's session. Multiple impressionId strings can be reported in the same Engine API call so long as they're associated with the same visitor.
Example Request for Recording Impressions
{
  "monetateId": "5.977810341.1521134874631",
  "channel": "a-12345678/d/example.test",
  "events":
  [
    {
      "eventType": "monetate:record:Impressions",
      "impressionIds":
      [
        "2.MTY3MTE3Ni4xLjE2MjE0MjcyODE",
        "2.MbV8QjE1MTQ4MDg5MDA"
      ]
    }
  ]
}
Example Second Response for Recording Impressions
{
  "meta":
  {
    "code": 200,
    "errors": []
  },
  "data":
  {
    "responses": []
  }
}
Request Filtering
The monetate:decision:DecisionRequest event supports two types of filtering.
The slots=[] attribute expects an array of strings, each of which is a slot name for an Engine API action (for example, omni_redirect). Only actions that have slot names matching one of the specified slots are evaluated, and for each slot the highest-priority action matching that slot is returned.
The actionTypes=[] attribute expects an array of strings, each of which is an action type for an Engine API action (for example, monetate:action:OmnichannelJson). Only actions that have an action type matching one of the specified action types are evaluated. Unlike the slot filters, it's possible to qualify for multiple actions with the same action type.
If the slots attribute is missing or consists of an empty array, then no slot filtering is performed. If the actionTypes attribute is missing or consists of an empty array, then no action type filtering is performed. If both slots and actionTypes are specified, then actions must match both the slots and actionTypes filters to be evaluated.
Sample Request
Here is an example of a monetate:decision:DecisionRequest event that considers only Omnichannel redirect actions using the slots=[] approach.
{
  "channel": "a-12345678/d/example.test",
  "events":
  [
    {
      "eventType": "monetate:decision:DecisionRequest",
      "requestId": "1111111",
      "slots":
      [
        "omni_redirect"
      ]
    },
    {
      "eventType": "monetate:context:PageView",
      "pageType": "homepage"
    }
  ]
}
Redirect Actions
When a monetate:decision:DecisionRequest event that doesn't include slot filtering is submitted, the site visitor might qualify for redirect actions, non-redirect actions, or some combination of the two:
- If the visitor qualifies for a redirect action and is assigned to the experiment group, then only that action is returned in the response.
- If the visitor qualifies for multiple redirect actions and is assigned to the experiment group for each of them, then the action with the highest priority is returned.
- If the visitor doesn't qualify for any redirect actions or is assigned to the control group for all redirect actions they do qualify for, then all non-redirect actions are returned.
Single-request full-page redirects also work when the monetate:decision:DecisionRequest event includes the attribute managedImpressions=True. If the site visitor qualifies for a redirect action and is assigned to the experiment group, only that action is returned in the response. The action includes an impressionId token that should be reported back to Monetate when the redirect occurs. If the visitor qualifies for a redirect action but is assigned to the control group, that redirect action is still included in the response and has an associated impressionId token, but the response indicates that it's a control action with the isControl=True flag.
The impressionId token for a given redirect action must be reported back to Monetate regardless of whether the visitor is in the experiment group or the control group. See Managed Impressions in this documentation for details about when and how to report the impressionId token. Be aware that the visitor should only be redirected to the URL included in the action if isControl=False.
Example Client-Side Logic
# Determine whether a redirect action exists among the actions in the response
for action in actions:
    if action['actionType'] == 'monetate:action:OmnichannelRedirect':
      # Report the impression regardless of whether the user
      # is in the experiment group or control group
      report_impression(action['impressionId'])

      # Only redirect if the user is in the experiment group
      if not action['isControl']:
          redirect_to_url(action['url'])
Third-Party Analytics
For Monetate tag-based experiences, third-party analytics integrations can be set up that execute client-side and send reporting labels directly to a vendor (for example, Google Analytics). Only experiences for which third-party reporting is enabled have their labels submitted.
For Engine API experiences, no formal third-party integrations are available. Instead, the Engine API response can include reporting data, and the requesting application is responsible for passing the data along to the preferred third-party analytics provider. These labels are made available when the includeReporting=true flag is added to the monetate:decision:DecisionRequest event.
Code Samples
Here are examples of a request and response that return reporting labels.
Example Request
{
  "channel": "a-12345678/d/example.test",
  "monetateId ": "5.977810341.1521134874631",
  "events":
  [
    {
      "eventType": "monetate:decision:DecisionRequest",
      "requestId": "11111",
      " includeReporting ": true
    },
    {
      "eventType": "monetate:context:IpAddress",
      "ipAddress": "127.0.0.1"
    },
    {
      "eventType": "monetate:context:PageView",
      "url": "https://www.example.test/path"
    }
  ]
}
Example Response
{
  "meta":
  {
    "code": 200
  },
  "data":
  {
    "responses":
    [
      {
        "requestId": "11111",
        "actions":
        [
          {
            "actionType": "monetate:action:OmnichannelJson",
            "impressionReporting":
            [
              {
                "experience_label": "omni-TPA-test-1",
                "variant_label": "B",
                "is_control": false
              }
            ]
          }
        ]
      }
    ]
  }
}